🌸Migrating to a NPM-based Homelab
#Gemini
Evaluating the risk.
(Oct 30, 2026)
#Q1: Can you check details for the following report? Should I turn off my machine?
【立即斷線⚠️】悲報 !! 大量 Synology NAS 一夜之間遭到勒索病毒攻陷,不少用戶登入 DSM 查看 File Station 時,發現不論是共享資料夾內的企業核心研發文件、資料庫映像檔,抑或日常備份檔,皆被加密為「.L0CK3D.」或「.L0CK3D」副檔名;各層目錄與系統根目錄下亦被寫入檔名為 read-me3.txt(內含 C3RB3R INSTRUCTIONS 字樣)的勒索信。HKEPC 呼籲所有 Synology NAS 用戶立即斷線「保平安」。

根據資安應急團隊對多宗 DSM 受害現場的逆向溯源分析,此波大規模感染並非源自傳統 Windows 電腦中毒後經由 SMB 共享協定連帶波及,而是黑客針對暴露於公網的 Synology NAS 設備,利用 2 個 CVSS 10.0 分的遠端程式碼執行(RCE)高危漏洞展開全網自動化攻擊。

◾Docker 容器滿分漏洞潛伏 Crond 排程任務︰許多企業習慣在 NAS 的 Container Manager(Docker)中自行架設 GitLab 程式碼庫、Confluence 知識庫或開源 Web 服務,並將連接埠映射至外部網絡。GitLab 日前接連爆出未授權 RCE 漏洞(如 CVE-2026-110264、CVE-2026-97229)。黑客透過自動化腳本攻入未修補的容器後,藉由高權限容器掛載目錄或宿主機逃逸缺陷,將惡意拉取腳本悄悄寫入 Linux 底層的 crond 定時排程中靜默潛伏。這也解釋了為何部分網管即便剛升級容器,設備仍在排程引爆時遭到鎖死。

◾Synology 原生套件「PHP2Shell」未授權漏洞(Synology-SA-26:14)︰官方日前發布代號為 Synology-SA-26:14 的安全性公告,證實波及全球的 PHP 核心 RCE 漏洞(CVE-2026-109618 與 CVE-2026-109619,俗稱 PHP2Shell)直接影響旗下 MailStation、Synology Calendar 等原生套件。黑客無須取得任何帳號密碼,即可由外部網絡連接埠直搗未更新套件的 DSM 底層,植入加密負載。

目前已得悉,當該款勒索程式於 Linux 底層啟動後,會從根目錄 / 展開多線程巡檢,遍歷所有掛載的儲存空間(如 /volume1、/volume2)。凡是存放於同台機器可寫入目錄下的本機備份(包括未啟用多版本鎖定或異地隔離的 Hyper Backup 目錄),均會被視為普通檔案一併加密鎖定。由於其底層採用高強度 RSA-4096 結合 AES / ChaCha20 演算法,在數學層面上絕不可能依靠一般算力暴力破解,坊間亦不存在所謂的「通用免費解密工具」。

如果你的 Synology NAS 目前還未被攻破,應立即依序執行以下防禦步驟:

◾實體拔除網絡線(立即斷網):立刻拔除 NAS 所有網絡線,或由路由器端切斷對外連接與內部網絡 SMB 共享,防止黑客進一步操控,並阻斷背景潛在的加密行程。

◾停用容器與排程,切勿異動檔案:若仍能由內部網絡直連登入管理介面,應迅速停止 Container Manager 中的所有容器,中止 Hyper Backup 與 Cloud Sync 等同步作業,避免受損檔案同步覆蓋雲端備份。嚴禁在系統內刪除任何檔案,亦不得進行儲存空間重組與資料整理。

如果不慎中招,必須完整保留勒索信與系統日誌,切勿自行重新安裝系統或初始化硬碟,應完整保留 read-me3.txt、SSH 登入紀錄及容器運行日誌,這些皆為後續判定加密步長、漏洞溯源及資安通報的核心鑑識證據,等待 Synology 官方公告及排解方法。#Q2: How's the risk of future infection if my NAS is mainly used as reverse proxy for web apps on other Qnap servers on my network?
#A: Using your Synology NAS as a reverse proxy means it is acting as the "front door" to your network. In this configuration, the risk of future infection remains HIGH, both for your Synology and your backend QNAP servers.
Here is a breakdown of why this setup is risky and how attackers exploit it:
#1. You are still exposing the NAS to the Public Internet
To act as a reverse proxy, your router must have ports (typically 80 and 443) forwarded directly to the Synology NAS. Automated botnets and ransomware scanners constantly scan the entire IPv4 internet for open ports. Even if you are routing traffic through the Synology to the QNAP, the Synology's web server (Nginx/Apache) is the first thing processing those malicious requests. If a future vulnerability is discovered in how DSM handles incoming web requests, your Synology will be compromised immediately.
#2. The "Lateral Movement" Threat to your QNAP
If hackers compromise your Synology NAS (e.g., via a zero-day exploit or a missed patch), they gain a foothold inside your local network. From the Synology, they can easily pivot and attack your QNAP servers. Since QNAP devices have their own history of severe ransomware attacks (like DeadBolt and Qlocker), having a compromised Synology on the same local network is incredibly dangerous.
#3. Application-Layer Attacks Pass Right Through
A standard reverse proxy does not inspect traffic for malicious payloads; it just forwards it. If the web apps hosted on your QNAP servers (e.g., WordPress, Nextcloud, or custom Docker containers) have vulnerabilities, attackers can send exploits right through the Synology reverse proxy to compromise the QNAP.
#How to drastically reduce your risk:
If you want to keep hosting web apps on your QNAP servers, you should change your network architecture to remove the NAS devices from the "edge" of your network.
1. Stop using the NAS as a Reverse Proxy NAS devices are designed for storage, not to be edge security appliances. Move your reverse proxy (like Nginx Proxy Manager, Traefik, or Caddy) to a cheap, dedicated device like a Raspberry Pi, a lightweight Linux Virtual Machine, or a dedicated router/firewall (like pfSense or OPNsense). If the reverse proxy gets compromised, your data isn't stored on it.
2. Use Cloudflare Tunnels (Zero Trust) instead of Port Forwarding This is the modern gold standard for home lab security. Instead of opening ports 80/443 on your router, you run a lightweight Cloudflare daemon (cloudflared) on a local machine. It creates a secure, outbound-only tunnel to Cloudflare's edge network.
- The benefit: You close all open ports on your router. Your network becomes invisible to automated scanners like Shodan, while your web apps remain accessible via your domain names.
3. Implement a Web Application Firewall (WAF) If you must expose web apps, put them behind a WAF (Cloudflare offers a free one). A WAF will actively inspect incoming traffic and block known exploits, SQL injections, and malicious bots before they ever reach your Synology or QNAP.
4. Network Isolation (VLANs) If your router supports it, put your exposed web apps on a separate VLAN or DMZ. If a web app on the QNAP gets compromised, the attackers won't be able to reach your personal computers, your Synology, or your private backup shares.
#Q3: My Synology and Qnap are on separate VLan behind a Synology router with firewall. Do I need a PC running Cloudflare 24/7 to replace the Synology?
#A: It is excellent that you have your Synology and QNAP on separate VLANs behind a hardware firewall. That is great network hygiene and significantly reduces the risk of "lateral movement" (an attacker jumping from one compromised device to another).
To answer your question directly: No, you absolutely do not need a dedicated, full-sized PC running 24/7.
If you want to use Cloudflare Tunnels (which is highly recommended because it allows you to close all open ports on your Synology Router), the software required (cloudflared) is incredibly lightweight. Here is how you can run it without buying or leaving a PC on:
#1. Run it in Docker on your NAS (Best Option)
Since you already have a Synology and a QNAP running 24/7, you can run the Cloudflare Tunnel daemon as a tiny, isolated Docker container on either machine.
- How it works: You install it via Synology's Container Manager or QNAP's Container Station. It uses almost zero CPU and RAM.
- The benefit: It reaches out to Cloudflare from inside your network. You can then go to your Synology Router and completely delete your port forwarding rules for ports 80 and 443. Even though the tunnel runs on the NAS, the NAS itself is no longer exposed to the public internet because there are no open inbound ports for hackers to scan.
#2. Run it on a Raspberry Pi or Mini PC
If you want to keep edge services completely off your storage devices, you can buy a cheap Raspberry Pi or a low-power mini PC (like an Intel N100 box). These draw about 3 to 5 watts of power and can run your Cloudflare Tunnel, a dedicated reverse proxy, and network ad-blockers (like Pi-hole) 24/7.
#If you decide NOT to use Cloudflare and keep your current setup:
Your current setup (Synology Router Firewall + VLANs + Synology NAS Reverse Proxy) is better than most, but you must understand its limitations:
- The Firewall limitation: Your router's firewall is doing its job, but because you are hosting web apps, you have to tell the firewall to let port 443 (HTTPS) traffic through to the Synology NAS. The firewall does not inspect the traffic for ransomware payloads; it just sees HTTPS and lets it pass.
- The VLAN limitation: The VLAN protects the QNAP from the Synology, but it does not protect the Synology from the internet. Because the Synology is acting as the reverse proxy, it is the device catching all the public web traffic. If a hacker exploits a vulnerability in the Synology's web server, your Synology (and all the personal data, photos, and backups on it) gets encrypted.
#How to harden your current setup (if you keep it as-is):
If you don't want to use Cloudflare Tunnels, you should immediately do the following on your Synology Router:
- Strict Geo-Blocking: Configure the Synology Router's Threat Prevention and Firewall to block all incoming traffic from countries you do not live in or travel to. This stops a massive percentage of automated botnets.
- Strict Inter-VLAN Rules: Ensure your router's firewall rules only allow the Synology to talk to the QNAP on the specific ports required for the web apps (e.g., port 8080). Block all other traffic (like SMB, SSH, or DSM ports) between the two VLANs.
- Keep DSM Updated: Since your Synology is on the front lines, you must apply DSM and package updates the day they are released.
#Q4: If I get a Synology that doesn't store files and put it on it's own VLan acting just as a reverse proxy? Cuz I need a easy to use RP with graphical UI and cert management.
#A: From a pure cybersecurity architecture standpoint, yes, this is a highly secure setup for your data.
What you are describing is essentially creating a DMZ (Demilitarized Zone). By placing a completely empty Synology NAS on an isolated VLAN, it acts as a sacrificial lamb. If a ransomware gang exploits a vulnerability in the Synology's web server, they only encrypt an empty machine. Because of the VLAN isolation, they cannot pivot to your QNAP or your main network.
However, while this works, I do not recommend it for a few practical reasons:
- It is expensive and overkill: You are buying a dedicated NAS just to run a reverse proxy. Furthermore, Synology's operating system (DSM) cannot boot from internal flash memory; it requires a hard drive to be installed to function. So you have to buy a NAS and a drive just to route web traffic.
- It is still a maintenance burden: You still have to log in and patch DSM, PHP, and other packages to prevent the device from being taken over and used as part of a botnet.
#The Better Alternative: Nginx Proxy Manager (NPM)
If your primary requirements are an easy-to-use graphical UI and automated SSL certificate management, you should look into Nginx Proxy Manager.
It is the gold standard for home lab users who want the power of a reverse proxy without ever touching a command line or writing code.
- Graphical UI: It has a beautiful, simple web interface where you just type in your domain name (e.g.,
app.yourdomain.com) and point it to your QNAP's internal IP address. - Cert Management: It has a built-in "Request Let's Encrypt Certificate" toggle. You click it, and it automatically fetches and renews your SSL certificates forever.
How to deploy it: Instead of buying a Synology, buy a cheap, low-power Mini PC (like an Intel N100 box, which costs around $100-$150) or a Raspberry Pi.
- Plug it into that isolated VLAN.
- Install a lightweight Linux OS and Docker.
- Run Nginx Proxy Manager.
This gives you the exact same DMZ security and graphical ease-of-use as the empty Synology idea, but for a fraction of the cost and with a much smaller attack surface.
#Don't forget: Cloudflare Tunnels has a UI too
If you use Cloudflare Tunnels (as mentioned previously), you don't even need to manage certificates. Cloudflare provides the SSL certificate at their edge servers automatically. The "Graphical UI" is simply the Cloudflare website dashboard, where you type in your domain and point it to your QNAP's internal IP. It is completely free, gives you the GUI you want, handles the certs, and allows you to close all ports on your router.
#Q5: How should I set my domains using Cloudflare? They are managed on GoDaddy pointing to a dynamic DNS link on the Synology router.
#Q6: Then is reverse proxy outdated? I didn't use Cloudflare because I have to trust Cloudflare to handle all my traffics. Reverse proxy feels like owning by myself.
#A: You have hit on one of the most important and hotly debated topics in the home lab and self-hosting community: Privacy vs. Security.
Your intuition is 100% correct. Reverse proxies are absolutely not outdated. In fact, they remain the absolute gold standard for anyone who prioritizes data sovereignty and privacy.
Here is the reality of the trade-off you are looking at:
#The Cloudflare Trade-off: High Security, Lower Privacy
When you use Cloudflare Tunnels (or even just Cloudflare's standard proxy), Cloudflare is performing what is essentially a "Man-in-the-Middle" (MITM) operation.
- How it works: The SSL certificate is held by Cloudflare. When you access your web app, the traffic is decrypted at Cloudflare's servers so they can inspect it for viruses, DDoS attacks, and malicious payloads. Then, they re-encrypt it and send it down the tunnel to your QNAP.
- The Catch: Because they decrypt it at their edge, you must trust Cloudflare. They technically have the ability to see your unencrypted traffic. For many people, the security benefit of closing all router ports is worth this privacy trade-off. But for self-hosting purists, this defeats the entire purpose of hosting your own data.
#The Self-Hosted Reverse Proxy: High Privacy, Higher Responsibility
If you want true end-to-end encryption where only you hold the SSL keys and nobody (not even your ISP or Cloudflare) can see your traffic, you must use your own reverse proxy.
If you go this route, you are the sole owner of your traffic. But it means you accept the responsibility of leaving ports 80 and 443 open on your router.
#How to safely run your own Reverse Proxy today:
If you want to own your traffic and avoid Cloudflare, here is the modern, secure way to do it without risking your NAS devices:
- Do not use the NAS as the Reverse Proxy: As we discussed, if a vulnerability is found in the reverse proxy software, you don't want the hacker landing on the device that holds your files.
- Set up a Dedicated DMZ Device: Buy a cheap Mini PC (like an Intel N100) or a Raspberry Pi. Put it on its own isolated VLAN (your DMZ).
- Install Nginx Proxy Manager (NPM) or Caddy: These are fantastic, free, self-hosted reverse proxies. NPM gives you the beautiful graphical UI you wanted, and it handles Let's Encrypt SSL certificates automatically. Because your server is requesting the Let's Encrypt certificate, your server holds the private decryption keys.
- Port Forwarding: On your Synology Router, forward ports 80 and 443 only to the IP address of this new Mini PC/Raspberry Pi.
- Keep your GoDaddy / DDNS setup: In GoDaddy, you will keep your CNAME record pointing to your
synology.meDDNS link. When traffic hits your router, it will be forwarded to your dedicated reverse proxy, which will then securely route it to your QNAP servers.
#Adding Active Defense (Crucial for Self-Hosting)
Because you have ports open, bots will scan your IP. To protect your self-hosted reverse proxy, you should implement:
- Geo-Blocking: Use your Synology Router to block all traffic from outside your home country.
- CrowdSec or Fail2ban: These are tools you can install alongside your reverse proxy. If a bot tries to guess a password or sends a malicious payload, these tools will instantly ban the bot's IP address at the firewall level.
Summary: You are not wrong for avoiding Cloudflare. If you want to own your data end-to-end, a self-hosted reverse proxy is exactly what you should use. You just need to move that proxy off your storage NAS and onto a cheap, dedicated device in an isolated VLAN to ensure your files stay safe from ransomware!
#Q7: If I have a spare Synology I think it's still at my best interest to put it in a DMZ and use the reverse proxy there.
#A: Since you already have a spare Synology NAS sitting around, yes, this is an excellent and highly secure plan.
Because you don't have to spend extra money on a Mini PC, using your spare Synology as a dedicated DMZ Reverse Proxy gives you exactly what you want: 100% ownership of your traffic, the familiar Synology graphical UI, automated Let's Encrypt certificates, and physical isolation for your real data.
If a massive zero-day ransomware attack happens in the future, the hackers will break in, encrypt an empty hard drive, and be completely trapped inside your DMZ, unable to reach your QNAP servers.
Here is the blueprint for setting up this "Sacrificial Reverse Proxy" securely:
#Step 1: Prepare the "Empty" Synology
Synology NAS devices cannot boot without a hard drive.
- Put a single, cheap, or old hard drive into the spare Synology.
- Install a fresh copy of DSM.
- Do not create any shared folders (other than what DSM requires).
- Do not put a single personal file, photo, or backup on this machine. Treat it purely as a network appliance.
#Step 2: Strip DSM Down to the Bare Minimum (Hardening)
Because this device will face the public internet, you want to reduce its "attack surface" as much as possible.
- Disable File Services: Go to Control Panel > File Services and turn off SMB, AFP, NFS, and FTP. You don't need them.
- Disable QuickConnect: Control Panel > External Access > QuickConnect. Turn it off.
- Uninstall Packages: Remove everything from the Package Center (Synology Photos, Drive, etc.). You only need the core OS.
- Enable Auto-Update: Since this is an edge device with no data on it, it is safer to let DSM automatically install the latest security patches immediately, rather than waiting for you to do it manually.
#Step 3: Configure the DMZ Firewall Rules (Crucial)
This is the most important step. You must configure your Synology Router so the spare NAS is strictly quarantined.
Assuming your network looks like this:
- VLAN 1 (Main): Your PCs, phones, etc.
- VLAN 2 (Storage): Your QNAP servers.
- VLAN 3 (DMZ): Your spare Synology Reverse Proxy.
Set up these firewall rules on your Synology Router in this exact order:
- Allow WAN to DMZ: Allow incoming internet traffic on Ports 80 and 443 to the IP address of the spare Synology. (This is your Port Forwarding rule).
- Allow DMZ to specific QNAP apps: Create a rule that allows the spare Synology's IP to talk to the QNAP's IP ONLY on the specific ports your web apps use (e.g., Port 8080, 8090).
- BLOCK DMZ to Storage VLAN: Block the spare Synology from talking to the QNAP VLAN on any other ports (especially block ports 22, 139, 445, and the QNAP admin ports).
- BLOCK DMZ to Main VLAN: Block the spare Synology from talking to your Main VLAN entirely.
#Step 4: Set up the Reverse Proxy
Now you can use the UI you are comfortable with!
- On the spare Synology, go to Control Panel > Login Portal > Advanced > Reverse Proxy.
- Click Create.
- Source: Type your GoDaddy domain (e.g.,
app.yourdomain.com), select HTTPS, and port 443. - Destination: Type the internal IP address and port of your QNAP server (e.g.,
http://192.168.20.5:8080). - Certificates: Go to Control Panel > Security > Certificate, click Add, and get your Let's Encrypt certificate for your domain. Assign it to the reverse proxy rule you just made.
#Summary
By doing this, your GoDaddy domain points to your router's DDNS. Your router passes the web traffic to the spare Synology in the DMZ. The spare Synology decrypts the traffic using your private SSL certificates, and then securely routes it through the firewall to your QNAP.
You maintain total privacy, zero reliance on Cloudflare, and excellent protection against ransomware!
#Q8: Can a QNAP be a reverse proxy in similar way?
#A: Yes, absolutely. A spare QNAP can serve the exact same "sacrificial DMZ" role as a spare Synology.
If you happen to have a spare QNAP instead of a Synology, you can put it on that isolated VLAN, strip it of all personal data, and use it strictly to route traffic to your main backend servers. The architectural security benefits are identical.
However, the way you configure the reverse proxy on a QNAP is slightly different. You have two main options on a QNAP:
#Option 1: QNAP's Native Reverse Proxy (Built-in UI)
Modern versions of QNAP's operating system (QTS and QuTS hero) have a built-in reverse proxy, similar to Synology's.
- Go to Control Panel > Network & File Services > Network Access > Reverse Proxy.
- Click Add to create a rule.
- You set the Source (your GoDaddy domain, HTTPS, Port 443) and the Destination (the internal IP and port of your main QNAP).
- For SSL certificates, you use QNAP's built-in certificate manager (Control Panel > Security > Certificate & Private Key) to generate your Let's Encrypt certificates and assign them.
Note: While this works, many users find QNAP's native reverse proxy UI a bit more clunky and less intuitive than Synology's Login Portal.
#Option 2: Nginx Proxy Manager via Container Station (Highly Recommended)
Because QNAP has excellent Docker support via Container Station, most QNAP users prefer to run Nginx Proxy Manager (NPM). NPM gives you a dedicated, beautiful web interface specifically designed for reverse proxying and SSL management.
- Open Container Station on the spare QNAP.
- Spin up the
jc21/nginx-proxy-managerDocker container. - Log into the NPM web interface.
- Type in your domain, point it to your backend QNAP, and click the "Request Let's Encrypt Certificate" toggle. It handles the rest automatically.
#CRITICAL: Hardening an Edge-Facing QNAP
If you decide to use a QNAP as your edge-facing DMZ device, you must be extremely aggressive with hardening it. Historically, QNAP devices have been targeted by automated ransomware gangs (like DeadBolt and Qlocker) more frequently than Synology devices when exposed to the internet.
Because this QNAP will be empty and in a DMZ, your actual data is safe. But you still don't want the spare QNAP getting infected and turning into a botnet node.
If you use a QNAP in the DMZ, do the following immediately:
- Change the Default QNAP Ports: QNAP uses ports 8080 and 443 for its admin login by default. You must change the QNAP admin ports to something else (e.g., 5000 and 5001) so that your Reverse Proxy can use standard ports 80 and 443 for web traffic without conflicting with the QNAP login screen.
- Disable myQNAPcloud: Turn this off completely. You do not want this edge device registering itself with QNAP's cloud servers.
- Disable UPnP: Ensure UPnP is disabled on both the QNAP and your Synology Router.
- Kill File Services: Just like the Synology, turn off SMB, NFS, AFP, and FTP in the Control Panel.
- Set Auto-Update: Go to Firmware Update settings and set it to automatically install security updates.
#Which is better for this role: The spare Synology or the spare QNAP?
If you have both sitting around and are choosing which one to put in the DMZ: Use the Synology.
Synology's DSM operating system has historically had fewer edge-facing vulnerabilities than QNAP's QTS. Furthermore, Synology's built-in Reverse Proxy (powered by Nginx under the hood) is baked right into the core OS UI and is incredibly stable and easy to use without needing to mess with Docker containers.
Keep your QNAP(s) safely hidden on your internal Storage VLAN, and let the empty Synology take the hits on the front lines!
#Q9: Does using databases more secure than flat files in general if I can store the same content? I think you can't lock a MariaDB backend..
#A: The short answer is: Yes, databases are generally much more secure and robust than flat files, but they protect against different types of threats.
It sounds like your concern about "locking a MariaDB backend" might stem from a misconception about how databases handle files on the hard drive. Let’s clear that up first, and then look at why databases usually win the security debate.
#The Misconception: "You can't lock a MariaDB backend"
If by "lock," you mean protecting the actual database files on the hard drive from being copied or read by a hacker, you absolutely can lock them.
- Transparent Data Encryption (TDE): MariaDB has native "Data-at-Rest Encryption." You can configure MariaDB to encrypt its database tablespaces and log files using an encryption key. If a hacker breaks into your server and copies the raw MariaDB files off the hard drive, those files are completely unreadable gibberish without the key.
- OS-Level Encryption: Just like flat files, the entire volume where the MariaDB data is stored can be encrypted using standard Linux tools (like LUKS) or your QNAP/Synology volume encryption.
- Strict Authentication: A flat file only requires the operating system to say, "Yes, this user has read permissions." A database requires a secondary layer of authentication (a database username, password, and specific host IP) before it will reveal any data.
#Why Databases are generally MORE secure than Flat Files:
- Granular Access Control: With a flat file (like a JSON or CSV), security is "all or nothing." If an application needs to read one line of the file, it must be granted permission to read the entire file. With MariaDB, you can create a user account that is only allowed to read a specific column in a specific table, and absolutely nothing else.
- Data Integrity (ACID): Databases are literally built around "locking" data during transactions. If two users try to write to a flat file at the exact same millisecond, the file can become corrupted. Databases use row-level locking to queue these requests, ensuring your data is never corrupted.
- Audit Trails: Databases can log exactly which user queried or modified which piece of data at what time. Flat files do not natively track who opened them.
#When are Flat Files MORE secure?
Flat files do have one major security advantage: A smaller attack surface.
A database like MariaDB runs as a network service (usually on port 3306). If there is a vulnerability in the database software, or if you accidentally expose port 3306 to the internet, a hacker can attack it over the network.
A flat file is just a dumb file sitting on a disk. It has no network port. It cannot be "hacked" directly; a hacker has to compromise the web server or application reading the file first.
#Context for your specific projects:
I recall you are building the Opus Classical Player and experimenting with Auto Bartender, and you specifically wanted to avoid a database backend to keep the architecture lightweight (using JSON context files and FLAC tags instead).
For your specific use case, flat files are actually the better choice. Since you are building a lightweight, read-heavy music player designed to load into RAM, introducing MariaDB would add unnecessary processing overhead and memory usage. Because your data (music tags, DJ notes, JSON files) isn't highly sensitive user data (like credit cards or passwords), the granular access control of a database is overkill.
As long as your flat files are sitting safely behind your DMZ Reverse Proxy and your application code doesn't allow "path traversal" (where a hacker tricks the app into reading ../../../../etc/passwd), your flat file approach is perfectly secure and much better optimized for your RAM-preloading goals!
#Q10: Do we wait for a hot fix from Synology? I can't find any reliable information on that. Some say DSM 7.4 is fine, some say not. Synology said the vulnerability was fixed back in 2024 but some said it's not fixed.
#Q11: How can I update them (Actually I've done an update a few days ago) without connecting the NAS to the internet if the lan cable is unplugged?
#A: Unplugging the LAN cable was the absolute smartest thing you could do during a vulnerability panic! "Pulling the plug" guarantees 100% safety while you figure out the patching situation.
You can easily update both the core DSM operating system and individual apps completely offline using Synology's Manual Update feature.
Here is how you do it using a separate, internet-connected computer (like your MacBook or PC):
#Step 1: Download the Update Files on your Computer
While your computer is connected to the internet, go to the Synology Download Center.
- Enter your exact NAS model number.
- For the DSM OS: Go to the "Operating System" tab and download the latest DSM patch. It will download as a
.patfile. - For the Packages (Apps): Go to the "Packages" tab. Search for the packages you need to update (especially PHP, Web Station, etc.) and download them. They will download as
.spkfiles.
#Step 2: Connect your Computer directly to the NAS
Since the NAS is disconnected from your router/switch, you need a way to talk to it locally.
- Take a standard Ethernet cable and plug one end directly into your computer, and the other end directly into the NAS.
- Wait a minute or two. Your computer and the NAS will automatically assign themselves local IP addresses (usually starting with
169.254.x.x). - Open your web browser and type in the NAS's IP address (or use
http://synologynas.local:5000/find.synology.com) to log into the DSM interface.
#Step 3: Manually Update the Core DSM
- Open Control Panel > Update & Restore.
- Click the Manual DSM Update button.
- Click Browse, select the
.patfile you downloaded, and click OK. - The NAS will install the update and reboot. (You may need to refresh your browser after it reboots).
#Step 4: Manually Update the Packages
- Open the Package Center.
- In the top right corner, click the Manual Install button.
- Click Browse, select the
.spkfile you downloaded (e.g., the PHP update), and click Next. - Follow the prompts to install it. Repeat this for any other
.spkfiles you downloaded.
Once you have manually installed the .pat and .spk files, your NAS is fully patched. You can then safely plug it back into your isolated Storage VLAN switch!
#Q12: Or can I block the DMZ from accessing the internet temporarily?
#A: Yes, absolutely! In fact, using your router's firewall to block the NAS (or the entire DMZ/VLAN) from the internet is a much more elegant and convenient solution than physically moving cables around.
This is exactly why having a proper router with VLAN and firewall capabilities is so powerful. You can cut off the NAS from the dangerous outside world, while still allowing your local MacBook or PC to talk to it over your safe internal network.
Here is how you can do this:
#The "Firewall Block" Method
1. Download the updates first
While your computer still has normal internet access, download the .pat (DSM OS) and .spk (PHP/Apps) files from the Synology Download Center to your computer, just like in the previous steps.
2. Block the NAS at the Router Level Log into your router (I recall you mentioning a Synology Router previously, but this applies to Unifi, pfSense, or any advanced router). You need to create a firewall rule that drops internet traffic for the NAS:
- Source: The IP address of your NAS (or the entire DMZ/Storage VLAN subnet).
- Destination: WAN / Internet.
- Action: Deny / Drop. (Make sure to also disable any Port Forwarding rules pointing to the NAS if you have any).
3. Plug the NAS back into the switch Now that the firewall rule is active, you can safely plug the NAS's LAN cable back into your network switch.
- Because of the firewall rule, the NAS cannot reach the internet, and the internet cannot reach the NAS.
- However, your internal local network routing is still intact.
4. Perform the Manual Update
- Open your web browser on your computer and type in the NAS's local IP address (e.g.,
192.168.x.x:5000). - Because your computer is on the local LAN, the router will allow you to connect to the NAS.
- Go to Control Panel > Update & Restore and do the Manual DSM Update using the
.patfile you downloaded. - Go to Package Center > Manual Install and upload the
.spkfiles.
#Why this is a great long-term strategy:
Honestly, if your NAS is strictly acting as a backend storage device for your Opus Classical Player, Auto Bartender, and local file sharing, you can just leave that firewall block in place permanently!
If the NAS never needs to browse the web or download things itself, blocking its outbound WAN access permanently is an incredible security hardening step. When you need to update it in the future, you just download the files to your Mac and manually upload them over the LAN. It completely neutralizes threats because even if a hacker somehow got a malicious script onto the NAS, the script wouldn't be able to "phone home" to the internet to download the ransomware payload.
#Q13: If I'm to use a QNAP as reverse proxy using docker/container station, does it work just like an extra mini PC in the network?
#A: Functionally, yes, it can act exactly like an extra mini PC (like a Raspberry Pi or an Intel N100 box) on your network, but there is a major security distinction you need to be aware of for your DMZ plan.
Here is exactly how it works and what you need to consider:
#1. How it acts like a Mini PC (The Networking)
When you run a reverse proxy (like Nginx Proxy Manager, Traefik, or Cloudflare Tunnels) inside QNAP's Container Station, you have two ways to connect it to your network:
- Bridge Mode (Default): The reverse proxy shares the QNAP's IP address but uses different ports (e.g.,
192.168.1.50:443). - MACVLAN Mode (The "Mini PC" Mode): You can assign the Docker container its own dedicated MAC address and its own unique IP address on your network (e.g.,
192.168.1.51). If you do this, your router and other devices will treat it exactly as if you plugged a physical mini PC into the switch.
Bonus: QNAP's Container Station also supports LXC (Linux Containers) alongside Docker. If you spin up an LXC container (like Ubuntu), it literally boots up a full Linux operating system, giving you an exact replica of a mini PC environment.
#2. The Security Catch (Crucial for your DMZ Plan)
While it looks like a separate PC to your network, it shares the same operating system kernel as the QNAP host.
This brings us back to your architecture:
- If this QNAP is a spare/old NAS: If you are putting this QNAP entirely in your DMZ VLAN, wiping all personal data off it, and using it strictly as a sacrificial reverse proxy, this is a brilliant use of hardware. If the reverse proxy gets hacked, the hacker only gets access to an empty QNAP.
- If this QNAP is your main storage: If you run the reverse proxy container on the same NAS that holds your Opus Classical Player FLAC files and personal data, you are breaking your DMZ isolation. If a hacker finds a "container escape" vulnerability in Docker, they can break out of the reverse proxy and gain root access to the underlying QNAP operating system, encrypting all your files.
#Summary
If you want to use Container Station on a QNAP to host your reverse proxy, it is incredibly efficient and works perfectly from a networking standpoint. Just make sure that the physical QNAP hosting that container is acting as your "sacrificial lamb" in the DMZ, completely separated from the NAS that actually holds your valuable data!
#Q14: If I'm just running a few web apps and my personal website do you think QNAP's built-in reverse proxy fine, supposed this QNAP is in the DMZ and is not responsible for storage at all?
#A: If this QNAP is strictly a sacrificial device in your DMZ with zero personal data on it, then yes, functionally, the built-in reverse proxy is perfectly fine for routing a few web apps and a personal website.
However, since you prefer understanding the exact mechanisms at play, let's look at the "under the hood" difference between using QNAP's built-in reverse proxy versus running one in Container Station. There is a distinct security and performance trade-off.
#How QNAP's Built-in Reverse Proxy Works
When you use the built-in reverse proxy (found in Control Panel > Network & Virtual Switch), you are essentially configuring the native Nginx web server that runs the QNAP QTS operating system itself.
The Pros:
- Zero friction: It is already there. You just type in the source domain and the destination IP/port.
- Integrated SSL: It ties directly into QNAP's built-in Let's Encrypt certificate manager.
The Cons (The Mechanism Flaw): Because the built-in proxy uses the native QTS web server, you are pointing public internet traffic directly at the core QNAP operating system's web engine. Historically, major QNAP ransomware attacks (like DeadBolt or QSnatch) exploited vulnerabilities in this exact native web server.
Even though this QNAP is a sacrificial lamb in the DMZ with no data to lose, if the QTS web server gets compromised, the hacker could turn your QNAP into a botnet node or use it to try and brute-force your internal firewall rules.
#Why a Docker Proxy (like Nginx Proxy Manager) is Better
If you use Container Station to run something like Nginx Proxy Manager (NPM) or Traefik, you change the routing mechanism:
- You forward ports 80 and 443 from your router directly to the Docker container, completely bypassing the QTS management web server.
- The container handles the internet traffic, the SSL certificates, and the routing.
- If a hacker exploits a web vulnerability, they are trapped inside a lightweight Alpine Linux Docker container, rather than having root access to the QNAP QTS operating system.
#The Verdict
If you want the absolute easiest setup and don't mind the (very small) risk of having to factory-reset your sacrificial QNAP if QTS gets hit by a zero-day, use the built-in proxy. It will route your personal site flawlessly.
But, since you are already comfortable with Container Station and are building a highly secure, segmented network, I highly recommend taking 10 extra minutes to install Nginx Proxy Manager in Docker. It gives you a much nicer interface, better security isolation, and keeps the public internet entirely away from the QNAP's native operating system.
#Q15: If I want the UI to be as close to Synology's reverse proxy as possible, is NPM the right choice? And do I forward my domain to a dynamic DNS of this sacrificial QNAP so the traffic can pass to it and go through NPM?
#A:
#1. Is NPM the right choice for a "Synology-like" UI?
Yes, absolutely. If you want a clean, visual, point-and-click interface, Nginx Proxy Manager (NPM) is exactly what you are looking for.
Many modern reverse proxies (like Traefik or Caddy) require you to write configuration files or add complex text labels to your Docker containers. NPM, on the other hand, gives you a beautiful web dashboard that works almost exactly like Synology’s or QNAP’s built-in menus:
- You click "Add Proxy Host".
- Source: You type in your domain name (e.g.,
app.yourdomain.com). - Destination: You type in the internal IP and port of your target web app.
- SSL: You go to the SSL tab, click "Request a new Let's Encrypt Certificate," and it handles the rest automatically.
- It even has simple toggle switches for things like "Websockets Support" (useful for certain apps) and "Block Common Exploits."
It gives you the exact same mental model as the built-in NAS tools, but with the safety of being isolated in a container.
#2. How to route your Domain via DDNS
Your logic is 100% correct. Because standard home internet connections have a dynamic public IP address that changes occasionally, you must use a DDNS (Dynamic DNS) service as the bridge.
Here is the exact flow of how the traffic will travel:
Step 1: The DDNS Setup You need a DDNS address that constantly tracks your home router's public IP.
- Best Practice: Set up the DDNS directly on your Router (most routers have a free built-in DDNS feature).
- Alternative: You can use QNAP's built-in
myQNAPcloudDDNS on the sacrificial NAS. However, be very careful: If you use myQNAPcloud, make sure you only enable the DDNS feature. Turn off "Auto Router Configuration" (UPnP) and "CloudLink," otherwise QNAP will try to bypass your strict DMZ firewall rules!
Step 2: The Domain Registrar (e.g., Cloudflare, GoDaddy, Namecheap)
Log into where you bought your personal domain (yourdomain.com).
Go to the DNS settings and create a CNAME record:
- Name:
app(or@for the root domain) - Target:
your-ddns-name.synology.me(or whatever your DDNS address is) - What this does: When someone types
app.yourdomain.com, the internet looks up your DDNS address, which then resolves to your home router's current public IP.
Step 3: The Router Firewall / Port Forwarding Now the traffic has reached your router's front door. You need to tell the router where to send it. Create a Port Forwarding rule:
- Forward Port 80 (HTTP) and Port 443 (HTTPS) directly to the Internal IP of your NPM Docker Container in the DMZ.
Step 4: Nginx Proxy Manager Does the Rest The traffic hits NPM. NPM looks at the request, says "Ah, they are asking for app.yourdomain.com," checks the visual rule you created in the UI, and seamlessly forwards the traffic to the correct web app or personal website.
This setup gives you the perfect balance: a clean, visual UI for management, strict container isolation, and reliable routing despite having a dynamic home IP!
#New network plan.
#Q16: If I want to re-arrange my network setup like this, what would you advise for the best security?
- Move the Synology NAS out of the DMZ for storage and non-critical PHP web app.
- Move QNAP server 1 to the DMZ and run NPM. This QNAP is serving some critical PHP web app now but not for data storage (except for files uploaded to the web app).
- Move critical websites from QNAP 1 to QNAP server 2 if strictly necessary. But storage space on this QNAP is quite limited. QNAP 2 is serving my ministry website, the Auto Bartender and my LifeNavi database.
I'm comparing this with the sacrificial Synology reverse proxy option.
#Q17: The Synology is not supporting docker. I can only use the built-in reverse proxy.
#A: This changes the equation entirely, and it makes your decision much easier!
If the Synology does not support Docker (which is common for their ARM-based "J" or "Play" series models), it fundamentally changes the "mechanism" of how it handles internet traffic.
Here is the exact mechanism-level breakdown of why QNAP 1 is the absolute winner for the DMZ role, and why the Synology should be kept safely inside.
#The Mechanism: Built-in Proxy vs. Docker Proxy
To use your modular synth metaphor, think of the public internet as a wild, unattenuated control voltage (CV) signal.
If you use the Synology (Built-in Proxy): Because it lacks Docker, you are forced to use the native DSM reverse proxy. This means you are patching that wild internet signal directly into the Synology's core operating system web server. There is no buffer. If a hacker sends a malicious request that exploits a flaw in the DSM web server (like the recent vulnerabilities we discussed), they instantly gain root access to the machine.
If you use QNAP 1 (Docker / NPM): Because QNAP 1 supports Container Station, you can run Nginx Proxy Manager inside a Docker container. Docker acts like an Opto-Isolator or a Buffer module. You patch the wild internet signal into the Docker container. The container processes the routing and passes a clean, safe signal to your internal apps. If a hacker sends a malicious payload, it blows up the container, but the underlying QNAP operating system remains completely untouched.
#The Final "Patching Paradigm" (Your Best Architecture)
Given your hardware constraints, here is exactly how you should route your network for maximum security:
1. The DMZ (The Buffer)
- Hardware: QNAP 1.
- Setup: Wipe your critical PHP apps off this machine. Run only Container Station with Nginx Proxy Manager.
- Why: It has the Docker capability needed to safely absorb and route internet traffic without exposing its core OS. It becomes your dedicated, sacrificial front door.
2. The Internal LAN (The Brains)
- Hardware: QNAP 2.
- Setup: Host your Ministry website, Auto Bartender, LifeNavi DB, AND move the critical PHP apps here from QNAP 1.
- Why: It is safely behind the router's firewall. The only traffic it receives is the clean, pre-routed traffic handed to it by NPM on QNAP 1.
3. The Internal LAN (The Vault)
- Hardware: Synology NAS.
- Setup: Use it strictly for heavy storage, your Opus Classical Player FLAC files, and internal-only tools.
- Why: Since it lacks Docker, it is highly vulnerable if exposed to the web. By keeping it in the internal LAN, its lack of Docker doesn't matter at all. It just sits quietly and safely, serving files to your local network.
By using QNAP 1 as the DMZ proxy, you get the beautiful, Synology-like UI of Nginx Proxy Manager, the structural safety of a Docker container, and you perfectly protect your databases and FLAC files!
#Q18: Can you give me a list of actions I need to do to implement this plan? Below are what I can think of:
- Assign a VLAN as the DMZ (Currently 192.168.3.X) and another as the Private LAN (192.168.1.X). My PCs are at the Admin LAN (192.168.4.X) with home devices connecting to the Default LAN (192.168.0.X). The DMZ and Private networks don't have Wifi enabled.
- Block the Synology network (Currently 192.169.3.X) from the internet in the Synology router and add geo-looking rule.
- Offline update and backup all files on the Synology server to an offline storage. Then move it out of the 192.169.3.X network. Take note of the current reverse proxy settings.
- Move critical web app (Just one) from QNAP 1 to QNAP 2. Since this web app is using dockerized PHP (actually a phoMyAdmin image) and MariaDB, I have to export the database (How can I ensure all views and tables get exported using phpMyAdmin?) and import it to the dockerized MariaDB on QNAP 2, which has the exactly the same environment as QNAP 1. I have to take note of all storage bind points set up in any docker image on QNAP 1.
- Install NPM on QNAP 1, enable dynamic DNS there and point all my domains to QNAP 1. Set up NPM by referencing to the Synology reverse proxy rules. Disable UPnP on QNAP 1 as well.
- Update the router firewall rules to route traffics from the IP of NPM to QNAP 2 or Synology on the Internal network.
Please fill in any gap I've left and arrange the action in the right orders for me.
#A: This is a highly logical and well-thought-out migration plan. You have identified all the major components. To ensure zero data loss and minimal downtime, we need to arrange this into a strict "mini-JIRA" sequence.
I have reorganized your steps into phases (Preparation, Migration, Re-patching, and Routing), filled in the missing gaps, and answered your specific question about phpMyAdmin.
(Note: In your prompt, you mentioned the Synology network as 192.169.3.X. I assume this was a typo for 192.168.3.X, as 192.169.X.X is actually a public IP range. I will use 192.168.3.X for the DMZ below).
#Phase 1: Preparation & Backup (Protect the Data)
Before moving any physical cables or changing IP addresses, secure the existing state.
- Document Existing Routing: Log into the Synology and take screenshots or notes of all current reverse proxy rules, source domains, and destination IPs/ports.
- Document QNAP 1 Containers: On QNAP 1, note all Docker environment variables and exact file paths for the storage bind mounts used by your PHP app and MariaDB.
- Backup Synology: Perform your offline update and backup all files on the Synology server to an offline storage drive.
#Phase 2: Application Migration (Move the Brains)
Move the critical web app from QNAP 1 to QNAP 2 while both are still in their original network locations.
- Export the Database (Answering your phpMyAdmin question):
- Log into phpMyAdmin on QNAP 1.
- Select your database on the left panel.
- Click the Export tab at the top.
- Choose the Custom - display all possible options export method.
- In the Tables section, ensure Select All is checked (this includes views).
- Scroll down to Object creation options and check Add DROP TABLE / VIEW / PROCEDURE / FUNCTION / EVENT / TRIGGER statement. (This ensures a clean overwrite when importing).
- Ensure both Structure and Data are selected.
- Click Export to download the
.sqlfile.
- Migrate Bind Mount Data: Copy the physical files from the QNAP 1 bind mount directories (e.g., uploaded files, config files) over to QNAP 2.
- Spin Up & Import on QNAP 2: Recreate the Docker containers on QNAP 2 using the copied files. Open phpMyAdmin on QNAP 2, go to the Import tab, and upload your
.sqlfile. - Test Locally: Access the web app via its local IP on QNAP 2 from your Admin LAN (192.168.4.X) to ensure it works perfectly.
#Phase 3: Network Re-patching (Moving the Hardware)
Now that the data is safe and apps are migrated, move the devices into their new VLANs.
- Wipe QNAP 1: Delete the PHP/MariaDB containers and their associated files from QNAP 1. It is now your empty, sacrificial module.
- Move Synology to Private LAN: Change the Synology's IP/VLAN assignment to the Private LAN (
192.168.1.X). - Move QNAP 1 to DMZ: Change QNAP 1's IP/VLAN assignment to the DMZ (
192.168.3.X). - Disable UPnP: Log into QNAP 1 and ensure UPnP / Auto Router Configuration is completely disabled.
#Phase 4: The Front Door (Setting up NPM)
- Install NPM: Install Nginx Proxy Manager via Container Station on QNAP 1.
- Configure DDNS: Enable Dynamic DNS on QNAP 1 (or preferably on your main router) to track your public IP.
- Recreate Proxy Rules: Log into the NPM web UI and recreate the proxy rules you documented in Step 1. Point the destinations to the new
192.168.1.XIP addresses of QNAP 2 (and Synology, if strictly necessary).
#Phase 5: Firewall & Routing (The Final Patch Cables)
Update the router to enforce the new architecture.
- Port Forwarding (WAN to DMZ): Forward external ports 80 and 443 from your router directly to the IP of NPM on QNAP 1.
- Pinhole Firewall Rules (DMZ to Private LAN): Create strict firewall rules allowing QNAP 1 (
192.168.3.X) to talk to QNAP 2 (192.168.1.X) ONLY on the specific ports required by your web apps (e.g., port 8080). Block all other traffic from the DMZ to the Private LAN. - Lock Down Synology: Create a firewall rule that blocks all inbound internet traffic to the Synology. (You can allow outbound traffic for NTP time sync and DSM updates, but block everything else). Add your Geo-blocking rules here as an extra layer.
- Update DNS: Finally, go to your domain registrar (e.g., Cloudflare) and ensure your CNAME records point to your DDNS address.
By following this exact sequence, you ensure your data is backed up and your apps are fully functional on the new server before you expose the new proxy to the internet.
#Q19: Actually, I'm now using the DDNS of the router. Can I continue to do so with NPM running on QNAP 1? If yes, can you update the procedures above? Also add reminder to backup the /hook and /images/ folder of the web app on QNAP 1.
#A: Yes, absolutely! In fact, using your router's built-in DDNS is the best practice. The router is the device directly connected to the modem, so it is always the first to know when your public IP changes.
Nginx Proxy Manager (NPM) does not need to know anything about your DDNS. NPM only cares about the traffic after it arrives at your front door. As long as your domain points to your router's DDNS, and your router forwards ports 80 and 443 to NPM, it will work perfectly.
Here is the updated, step-by-step "mini-JIRA" sequence, incorporating your router's DDNS and the specific folder backup reminders:
#Phase 1: Preparation & Backup (Protect the Data)
- Document Existing Routing: Log into the Synology and take screenshots or notes of all current reverse proxy rules, source domains, and destination IPs/ports.
- Document QNAP 1 Containers: On QNAP 1, note all Docker environment variables and exact file paths for the storage bind mounts used by your PHP app and MariaDB.
- Backup Synology: Perform your offline update and backup all files on the Synology server to an offline storage drive.
- CRITICAL BACKUP: Manually backup the
/hookand/images/folders of the web app currently running on QNAP 1 to a safe, offline location.
#Phase 2: Application Migration (Move the Brains)
- Export the Database:
- Log into phpMyAdmin on QNAP 1.
- Select your database, click Export, choose Custom.
- Ensure Select All tables (including views) is checked.
- Check Add DROP TABLE / VIEW / PROCEDURE... in the object creation options.
- Ensure both Structure and Data are selected, then click Export.
- Migrate Bind Mount Data: Copy the physical files from the QNAP 1 bind mount directories over to QNAP 2. Ensure the
/hookand/images/folders are carefully copied to their exact corresponding paths on QNAP 2. - Spin Up & Import on QNAP 2: Recreate the Docker containers on QNAP 2 using the copied files. Open phpMyAdmin on QNAP 2, go to the Import tab, and upload your
.sqlfile. - Test Locally: Access the web app via its local IP on QNAP 2 from your Admin LAN (192.168.4.X) to ensure it works perfectly.
#Phase 3: Network Re-patching (Moving the Hardware)
- Wipe QNAP 1: Delete the PHP/MariaDB containers and their associated files from QNAP 1. It is now your empty, sacrificial module.
- Move Synology to Private LAN: Change the Synology's IP/VLAN assignment to the Private LAN (
192.168.1.X). - Move QNAP 1 to DMZ: Change QNAP 1's IP/VLAN assignment to the DMZ (
192.168.3.X). - Disable UPnP: Log into QNAP 1 and ensure UPnP / Auto Router Configuration is completely disabled.
#Phase 4: The Front Door (Setting up NPM)
- Install NPM: Install Nginx Proxy Manager (
jc21/nginx-proxy-manager:latest) via Container Station on QNAP 1 using the Docker Compose method. - Verify DDNS & Domains: Ensure your router's DDNS is active. Go to your domain registrar (e.g., Cloudflare) and ensure your CNAME records for your apps still point to your router's DDNS address.
- Recreate Proxy Rules: Log into the NPM web UI (Port 81) and recreate the proxy rules you documented in Step 1. Point the destinations to the new
192.168.1.XIP addresses of QNAP 2 (and Synology, if strictly necessary).
#Phase 5: Firewall & Routing (The Final Patch Cables)
- Port Forwarding (WAN to DMZ): Forward external ports 80 and 443 from your router directly to the new IP of NPM on QNAP 1 (
192.168.3.X). - Pinhole Firewall Rules (DMZ to Private LAN): Create strict firewall rules allowing QNAP 1 (
192.168.3.X) to talk to QNAP 2 (192.168.1.X) ONLY on the specific ports required by your web apps (e.g., port 8080). Block all other traffic from the DMZ to the Private LAN. - Lock Down Synology: Create a firewall rule that blocks all inbound internet traffic to the Synology. Add your Geo-blocking rules here as an extra layer.
Setting things up.
#Q20: When setting up the DMZ like the screenshot shows on Synology router, do I enable the "Enable network isolation" option or just to block Synology NAS from the internet at the firewall?
#A: Yes, you should enable "Enable network isolation" for the DMZ, but you must also understand exactly what this switch does so you can route your traffic correctly.
To use your modular patching metaphor: checking this box removes all the default "mult" connections between your networks.
Here is the precise mechanical breakdown of why you need it, and what else you still have to do:
#1. What "Enable network isolation" actually does
Checking this box tells the Synology router to block all Inter-VLAN routing by default. It means anything in the DMZ (192.168.3.X) cannot talk to your Private LAN (192.168.1.X), Admin LAN (192.168.4.X), or Default LAN (192.168.0.X).
- Why this is good: If QNAP 1 (in the DMZ) gets compromised from the outside, the attacker is trapped in the DMZ. They cannot scan or access your Admin PC or your Synology NAS.
- The Catch: Nginx Proxy Manager (QNAP 1) needs to talk to your web app (QNAP 2) in the Private LAN.
- The Solution: Synology SRM's firewall processes rules from top to bottom. You will check this isolation box, but then go to Network Center > Security > Firewall and create a specific Allow rule (a dedicated patch cable) that says: Allow Source: QNAP 1 IP -> Destination: QNAP 2 IP on Port 8080 (or whatever your app uses). This punches a tiny, controlled hole through the isolation.
#2. Why it doesn't replace blocking the Synology NAS
"Network isolation" only stops LAN-to-LAN traffic. It does not stop devices from reaching the Internet (WAN).
If you put your Synology NAS in the Private LAN, it will still be able to reach the internet (and the internet could potentially reach it if ports were forwarded).
Therefore, you must do both:
- Check the "Enable network isolation" box on the DMZ to protect your internal networks from the DMZ.
- Create a specific Firewall Rule to block the Synology NAS from the internet (Source: Synology NAS IP -> Destination: All -> Action: Deny).
#Summary of your Firewall Rules (Top to Bottom order):
- Allow: QNAP 1 (DMZ IP) -> QNAP 2 (Private IP) on specific Web App ports. (Punches the hole for NPM)
- Deny: Synology NAS (Private IP) -> Internet (WAN). (Blocks NAS from phoning home/internet)
- Allow: Any -> QNAP 1 (DMZ IP) on Ports 80/443. (Lets the world see your NPM)
By checking that box and setting these rules, you are building a perfectly structured, highly secure routing environment.
#Q21: Why after Denying Synology NAS Private IP -> Internet, I'm still able to access the website that replies on reverse proxy of the Syno. NAS? I tried both placing the rule at the top or to the bottom.
#A: This is a classic routing phenomenon! You are experiencing the difference between directionality, stateful firewalls, and a feature called NAT Loopback (Hairpinning).
To use your modular patching metaphor: you unplugged the Output cable from the Synology NAS to the outside world, but the Input cable from the outside world to the NAS is still plugged in.
Here is the precise mechanical breakdown of why this is happening, and how to actually stop it:
#1. Directionality (Inbound vs. Outbound)
The rule you created (Source: Synology NAS -> Destination: Internet -> Deny) is an Outbound rule. It stops the NAS from initiating a connection to the outside (e.g., checking for DSM updates or syncing to a cloud).
However, it does not block the internet from initiating a connection in to the NAS. Because modern firewalls are "stateful," if an outside device knocks on the NAS's door (Inbound) and the router allows it, the firewall automatically allows the NAS to reply to that specific request, ignoring your Outbound deny rule.
#2. Port Forwarding Overrides
If you still have Port Forwarding set up in the Synology Router (Network Center > Port Forwarding) pointing ports 80 and 443 to the Synology NAS, the router treats this as an explicit VIP pass. Port forwarding rules automatically punch inbound holes in the firewall.
- The Fix: You must delete or disable the port forwarding rules pointing to the Synology NAS. (Eventually, you will point these to QNAP 1 / NPM).
#3. NAT Loopback (The "Hairpin" Effect)
How are you testing this? If you are sitting at home, connected to your local Wi-Fi, and you type your domain name into your browser, your traffic never actually goes out to the internet. Your Synology router sees the request, realizes the public IP belongs to itself, and immediately "hairpins" the traffic directly to the NAS on the local network. Since the traffic never touched the WAN/Internet interface, your firewall rules blocking WAN traffic are completely bypassed.
- The Fix: To truly test if your site is blocked from the internet, you must disconnect your phone from Wi-Fi and test it using cellular data only.
#How to truly lock down the Synology NAS:
If you want to ensure absolutely zero traffic can reach the Synology NAS from the outside world, you need to cut the inbound patch cable:
- Remove Port Forwarding: Go to Port Forwarding and delete any rules pointing to the Synology NAS IP.
- Create an Inbound Deny Rule: In your Firewall, create a rule that says:
- Source: All (or Internet/WAN)
- Destination: Specific IP -> [Synology NAS IP]
- Action: Deny
- Test from Outside: Turn off Wi-Fi on your phone and try to load the website on 5G/LTE. It should now time out completely.
#Q22: I found it's under the Port Forwarding > Settings. I've disabled the forwarding rules. Should I uncheck these three boxes?
#A: Yes, absolutely. You should uncheck all three of those boxes.
To use your framing: these three checkboxes are the "fast brain" of the router trying to "help" you by plugging in patch cables behind your back. By unchecking them, you are enforcing the "structured buffer" where nothing routes unless you explicitly authorize it in your main Firewall list.
Here is the exact mechanism of what each box does, and why turning them off is the right move for your DMZ architecture:
#1. "Restore UPnP rules upon startup"
- The Mechanism: If a device on your network uses UPnP to request an open port, the router usually holds that in its temporary memory. If the router reboots, this box tells it to remember and re-apply those automatic rules.
- Why uncheck it: You are disabling UPnP entirely. Unchecking this ensures that if any legacy UPnP rules were stuck in the router's memory, they are wiped clean on the next reboot and never come back.
#2. "Generate firewall rules automatically (UPnP)"
- The Mechanism: This is the most dangerous box for a strict setup. It means that when a device asks for a port forward via UPnP, the router will not only forward the port, but it will silently write a hidden allow rule into your firewall to let the traffic through.
- Why uncheck it: It completely bypasses your carefully constructed, top-to-bottom firewall logic. You want your firewall to be the absolute source of truth.
#3. "Generate firewall rules automatically (Port Forwarding)"
- The Mechanism: This is a "convenience" feature for standard home users. It means if you manually create a Port Forwarding rule (e.g., pointing Port 443 to QNAP 1), the router will automatically generate the corresponding Firewall Allow rule in the background so you don't have to do it yourself.
- Why uncheck it: In a complex DMZ/VLAN setup, "convenience" leads to confusion. If you leave this checked, you will have invisible rules allowing traffic that don't show up in your main Security > Firewall list.
#The Result of Unchecking These
Once you uncheck these, your router becomes a strict, obedient module.
Moving forward, when you are ready to expose your Nginx Proxy Manager (QNAP 1), you will have to do two explicit manual steps (plugging in two specific cables):
- Create the Port Forward (Network Center > Port Forwarding): Send incoming Port 443 to QNAP 1.
- Create the Firewall Rule (Network Center > Security > Firewall): Allow WAN to QNAP 1 on Port 443.
This might feel slightly "slower," but it guarantees absolute structural integrity. No traffic will ever reach your NAS or your DMZ unless you can see the exact rule allowing it on your screen.
Back to planning a bit.
#Q23: Are there ways that prevent locking at the file levels? I'm thinking to lock a file it has to be mofied. If we forbit a file from being edited would in enhance security?
#A: This is a brilliant question that touches on the fundamental difference between how data is stored on a disk versus how the Operating System (OS) manages that data in RAM.
To answer your question directly: Forbidding a file from being edited absolutely enhances security (it is the gold standard for defeating ransomware), but your premise about how file locking works has a slight mechanical misunderstanding.
Here is the precise mechanism of how file locking actually works, and how "forbidding edits" takes security to the next level.
#1. The Mechanism of File Locking (It doesn't modify the file)
You mentioned: "I'm thinking to lock a file it has to be modified."
Mechanically, this is incorrect. When a program (like a text editor or a database) "locks" a file, the file on the hard drive is not modified at all.
Instead, the lock is handled entirely in the Operating System's RAM. Think of the OS Kernel as the master control module. When Program A opens a file and requests a lock, the OS writes a note in its own internal memory (the File Descriptor Table) saying: "Program A is currently using File X. Do not let Program B write to it."
Because the lock exists only in the OS's "fast brain" (RAM), if the server crashes or reboots, the lock instantly vanishes. The file on the disk never knew it was locked. File locking is primarily about preventing data corruption (two programs writing at the exact same time), not necessarily about security.
#2. Forbidding Edits: The Concept of "Immutability"
What you are proposing—forbidding a file from being edited at all—is a completely different mechanism called Immutability or Read-Only access.
If you physically (or virtually) sever the "Write" patch cable to a file, you massively enhance security. There are two levels to this:
Level A: Standard Permissions (Read-Only) In systems like your QNAP or Synology, you can set file permissions so that a user or an app can only Read the file, but not Write to it.
- Security Benefit: If your Nginx Proxy Manager gets hacked, the hacker only has the permissions of the NPM app. If your critical files are Read-Only to NPM, the hacker cannot modify them to inject malicious code.
Level B: The Immutable Flag (chattr +i)
At the deepest Linux filesystem level (which your NAS uses), there is a special attribute called the Immutable Flag. If you apply this to a file (using the command chattr +i filename), you are telling the filesystem itself: "This file is frozen."
- The Mechanism: Once a file is immutable, nobody can modify it, delete it, or rename it. Not the admin, not the system, not even the
rootsuperuser. To change the file, a human administrator must explicitly log in and remove the immutable flag first.
#Why this is the ultimate security enhancement
Making files (especially backups and core system configurations) immutable is currently the single most effective defense against Ransomware.
Ransomware works by opening your files, encrypting the data, and saving the modified file. If a file is Read-Only or Immutable, the ransomware's request to write the encrypted data back to the disk is instantly rejected by the OS Kernel. The attack fails mechanically.
Summary for your architecture: If you have files that NPM or your web apps need to read to function (like static HTML files, audio FLAC files for your Opus player, or configuration JSONs), but they never need to modify them, setting those files to Read-Only is an excellent, highly structured security practice. It ensures the app can play the audio or serve the site, but a compromised app can never overwrite your original data.
#Q24: So the Synology vulnerability that started this chat actually requires a Write permission to lock the file? If the ransomware just lock the file in RAM, restarting the server should solve the problem.
#A: You have hit on the exact center of the semantic confusion! Your logic is 100% flawless: if ransomware merely used an OS-level file lock (in RAM), a simple reboot would indeed instantly cure the server.
However, when ransomware hackers say they have "locked" your files, they are using the word as a metaphor. They aren't using an OS file lock; they are encrypting the file.
Here is the precise mechanical difference, and why your deduction about Write permissions is absolutely correct:
#The Ransomware Mechanism (Encryption, not OS Locking)
When ransomware (like the DeadBolt or eCh0raix attacks that have targeted Synology and QNAP in the past) hits a NAS, it performs the following loop on every file it can find:
- Read: It opens your original file (e.g.,
photo.jpg). - Process (in RAM): It runs the binary data of that file through a cryptographic algorithm using a private key, scrambling the data into unreadable noise.
- Write: It writes that scrambled data back to the hard drive, either overwriting
photo.jpgor saving it asphoto.jpg.encryptedand deleting the original.
Because the actual physical 1s and 0s on the hard drive have been rewritten, restarting the server does nothing. The data on the disk is now scrambled.
#Why Write Permissions are the Ultimate Defense
Because Step 3 of the ransomware loop requires writing to the disk, yes, the ransomware absolutely requires Write permissions to do its damage.
If a vulnerability allows a hacker to get into your Synology, the ransomware runs under the permissions of whatever user or service was compromised.
- If the compromised service only has Read-Only access to your shared folders, the ransomware will successfully complete Step 1 (Read) and Step 2 (Process in RAM), but when it attempts Step 3 (Write to disk), the OS Kernel will instantly block it. The attack fails.
- If the files are flagged as Immutable, even if the ransomware compromises the
rootadmin account, the OS Kernel will still block the Write attempt.
This is why the principle of "Least Privilege" is so critical in your architecture. If your Nginx Proxy Manager, your Opus Classical Player, or your media server only ever needs to read files to serve them to you, you should strictly deny them Write permissions at the NAS folder level. It acts as a physical hardware block against encryption attacks.
Setting things up again.
#Q25: Yes, I can see it at port 81! Since I've not yet done backing up my Synology and QNAP 1, I'm just verifying if NPM can work. I will reinstall again once QNAP 1 has been backed up and restored. Can you tell me how I can test NPM with the minimum amount of settings? I can see the dashboard showing zero Proxy Hosts.
#Q26: I've set it up as you instructed but I still see the Congradulations page.
#Q27: Control-shift-R on the browser solves the problem! Can I test redirecting a domain to my QNAP admin page?
#Q28: I think I want to test it on the real thing. My domain is still pointing to my Synology router. How can I forward traffics at port 80 to the domain to the QNAP admin page at port 8080?
#A: To test this on the "real thing," we need to complete the physical signal path from the outside world all the way to your QNAP.
Right now, your domain's signal is hitting the outside of your Synology router and stopping, because the router doesn't have a patch cable telling it where to send Port 80 traffic.
Here is the exact mechanism to route that signal through your router, into NPM, and finally to the QNAP.
#The Signal Flow (How it will work)
Internet (Domain) ➔ Synology Router (Port 80) ➔ NPM (Port 80) ➔ QNAP (Port 8080)
#Phase 1: The Synology Router (Port Forwarding)
We need to tell your router to pass all incoming HTTP traffic directly to your NPM module.
- Log into your Synology Router's management interface (SRM).
- Open Network Center and go to Port Forwarding (on the left menu).
- Click Create to add a new rule.
- Fill in the details:
- Name: NPM HTTP (or anything you like)
- Private IP Address: Enter the IP address of your NPM (e.g.,
192.168.1.50). - Public Port:
80 - Private Port:
80 - Protocol:
TCP
- Click OK / Apply to save the rule.
(Note: When you are ready to set up SSL certificates later, you will repeat this exact step for Port 443).
#Phase 2: The NPM Module (The Routing Rule)
Now that the router is passing the signal to NPM, NPM needs to know what to do when it sees your specific domain name.
- Go to your NPM Admin panel (Port 81).
- Edit your Proxy Host (or create a new one).
- Domain Names: Enter your actual real domain (e.g.,
admin.yourdomain.com). Press Enter to lock it in. - Forward Hostname / IP: Enter the IP address of your QNAP.
- Forward Port:
8080 - Click Save.
#Phase 3: The Real-World Test
To ensure you are testing the actual public routing and not getting caught in your local network's internal loop (NAT Loopback), the best way to test this is from an outside connection.
- Take your smartphone and turn off Wi-Fi so you are on cellular data (4G/5G).
- Open a mobile browser and type in your domain:
http://admin.yourdomain.com
The Mechanical Result:
Your phone asks the public internet for your domain. The DNS points it to your Synology router's public IP. The router sees the traffic on Port 80 and blindly forwards it to NPM. NPM reads the HTTP header, sees admin.yourdomain.com, matches it to your rule, and fetches the QNAP login page on Port 8080.
If the QTS login page loads on your phone's cellular connection, your entire reverse proxy architecture is successfully patched and fully operational!
#Q29: I've setup the domain to www.claudioflute.live and forward it to the QNAP admin page at port 8080. The phone cannot load any page and show a time out error when visting http://www.claudioflute.live .
#Q30: Since things were working fine with the Synology's reverse proxy, I think you can narrow things down more. I've added a port forwarding rule for port 443 but it still can't show any website. But visiting "http://www.claudioflute.live/” on my PC can show the QNAP admin page.
#A: That is a massive and perfect clue. If the PC (inside your network) can load the page using the public domain name, but the phone (outside your network) times out, we have successfully isolated the exact point of failure.
Your NPM is configured perfectly. Your DNS is perfect. Your ISP is not blocking anything.
The impedance mismatch is happening entirely at the Synology Router's front door.
#The Mechanism: Why the PC works but the Phone fails
When your PC asks for www.claudioflute.live, the signal goes to the Synology router. Because the PC is already inside the house, the router uses a mechanism called NAT Loopback (or Hairpin NAT). It catches the signal from the inside, bounces it off the inside of the front door, and hands it directly to your port forwarding rule (NPM).
When the phone asks for the same domain, it approaches the router from the outside (the WAN). The router is dropping the external packets before they can reach the port forwarding rule.
Since you previously used Synology's built-in reverse proxy, here are the three mechanical reasons the router is dropping the external WAN signal, and how to clear them:
#1. The Firewall Rule (Most Likely)
In Synology Router Manager (SRM), Port Forwarding and the Firewall are two separate modules. Sometimes, creating a port forwarding rule does not automatically punch the corresponding hole in the firewall for outside traffic.
- The Fix: In the Synology Router, go to Network Center > Security > Firewall.
- Look for rules regarding Port 80 and 443.
- You need to ensure there is an Allow rule where the Source is
All(or Internet), and the Destination is your NPM IP address on Ports 80 and 443. If it's missing, create it and hit Apply.
#2. The Ghost of the Old Proxy (Port Hijacking)
If you were using Synology's built-in Reverse Proxy (either on the router itself or on the Synology NAS), the router's internal OS might still be claiming ownership of Ports 80 and 443 on the WAN side. The router's internal services always take priority over user-defined port forwarding rules.
- The Fix: If the old reverse proxy was running on the Synology NAS, make sure any old port forwarding rules pointing to the Synology NAS IP are completely deleted or unchecked.
- If the reverse proxy was running on the Router itself, you need to go into the router's settings and explicitly delete the old reverse proxy rules so it releases its grip on those ports.
#3. SRM's "Safe Access" or Threat Prevention
Synology routers have aggressive security modules that sometimes silently drop incoming HTTP/HTTPS requests if they don't recognize the certificate or if they think it's a probe.
- The Fix: If you have the Threat Prevention or Safe Access packages running on the router, temporarily pause them. Try the phone again. If it instantly loads, you know the security module was intercepting the external handshake.
Summary of action: Check the SRM Firewall tab first. Since Hairpin NAT works, the signal path from Router -> NPM -> QNAP is flawless. We just need to tell the Synology firewall to let the external signal cross the threshold.
#Q31: Adding the firewall rule connects the website successfully. Actually, how should I determine the order (from top to down) of the FW rules?
#A: Excellent. The firewall was exactly the bottleneck blocking the outside signal.
When it comes to firewall rules, the universal mechanical principle is "Top-Down, First Match Wins."
Think of the firewall as a series of gates. When a packet of data arrives, the router reads the list of rules starting from rule #1 at the top. The absolute millisecond the packet matches a rule, the router executes that action (Allow or Deny) and stops reading the rest of the list. It will never see the rules below the match.
Because of this, the order is critical for both security and performance. Here is the industry-standard architecture for layering your firewall rules, from top to bottom:
#1. The Explicit Blocks (The Blacklist)
Position: Very Top
- What goes here: Rules that block specific, known threats. For example, if you notice a specific IP address from a foreign country constantly trying to hack your NAS, you create a rule: Deny IP [X.X.X.X].
- Why it's at the top: You want malicious traffic dropped instantly before the router wastes CPU cycles checking it against your allowed services.
#2. The Explicit Allows (The VIP List)
Position: Upper Middle
- What goes here: Your highly specific, public-facing services. This is where your NPM Port 80 and 443 rules belong.
- Why it's here: If a packet isn't from a blocked hacker (passed Layer 1), and it's asking for Port 443, the router sees this rule, says "Ah, you're on the list, head over to NPM," and lets it through.
#3. The Internal Network Rules (The Trust Zone)
Position: Lower Middle
- What goes here: Rules allowing your internal devices to talk to each other, or allowing your local subnets to access the internet. (e.g., Allow Source: 192.168.1.x to Destination: All).
- Why it's here: Internal traffic is usually safe, but you still want to process specific external blocks and allows first.
#4. The Catch-All / Implicit Deny (The Brick Wall)
Position: The Absolute Bottom
- What goes here: A final rule that says: If a packet has made it this far down the list and hasn't matched ANY of the rules above... Drop it.
- How Synology handles this: In SRM, you usually don't have to write this rule manually. At the very bottom of the Firewall page, there is a setting that says "If no rules are matched: [Allow/Deny]". For a secure network, this should always be set to Deny.
#Summary for your setup:
Just make sure your NPM Allow rules (Ports 80/443) are placed above any broad "Deny All" rules, and below any specific IP blocks you might create in the future. As long as the signal hits your Allow rule before it hits a Deny rule, the patch cable remains connected.
(Oct 31, 2026)
#Q32: Please update the list of actions to include exporting server settings of QNAP 1 so that in case I miss something it can be restored.
#Q33: Please add exporting the web app database and remove two drives from QNAP 1 to make it single-drive.
#A: Here is your updated, comprehensive action plan. I have added the database export to the backup phase and inserted the physical removal of the drives right before the rebuild, ensuring your new storage pool is created cleanly on just the single drive.
#Phase 1: The Pre-Wipe Backups (The Safety Net)
Before you touch the factory reset button or remove any hardware, secure these four things:
- Export QNAP 1 System Settings:
- Go to QNAP Control Panel > System > Backup / Restore > Backup/Restore Settings.
- Click Backup to download the
.binfile to your local computer. (This saves your users, groups, network settings, and privileges just in case).
- Export the Web App Database (NEW):
- Depending on how your web app is built (e.g., MySQL, MariaDB, PostgreSQL, or a built-in app tool), generate a full database dump (like a
.sqlfile) and download it to your local computer. This is the actual "brain" and text data of your web app.
- Depending on how your web app is built (e.g., MySQL, MariaDB, PostgreSQL, or a built-in app tool), generate a full database dump (like a
- Back up Web App Folders:
- Manually copy your web app's
/hookand/images/folders to your local computer or your Synology NAS.
- Manually copy your web app's
- Document Network Settings:
- Take a screenshot of your QNAP's current IP address, gateway, and DNS settings so you can easily assign it to the correct VLAN (DMZ or Private) when it wakes back up.
#Phase 2: Physical Adjustment & The Wipe
- The Factory Reset:
- Go to QNAP Control Panel > System > Backup / Restore > Restore to Factory Default.
- Choose to Reinitialize the NAS. It will wipe the data and eventually power down or reboot.
- Physical Drive Removal (NEW):
- Once the NAS is fully powered off during the reset process (or by manually shutting it down after the wipe), physically pull out the two drives you no longer want to use.
- Leave only the single drive you intend to use for this new setup securely in its bay.
- Initial Setup:
- Power the NAS back on. Because it was wiped and now only sees one drive, the QNAP setup wizard will guide you to create a fresh, single-drive storage pool.
- Assign the QNAP to its designated VLAN IP address (e.g.,
192.168.3.Xfor DMZ or192.168.1.Xfor Private LAN).
#Phase 3: The Restoration
- Restore System Settings (Optional):
- If you want your old users and network configs back exactly as they were, go to Control Panel > System > Backup / Restore and upload the
.binfile. (Note: Since you are redesigning for security, building users from scratch is often safer, but you have the file if you need it).
- If you want your old users and network configs back exactly as they were, go to Control Panel > System > Backup / Restore and upload the
- Restore Web App Data & Database (UPDATED):
- Recreate your shared folders.
- Move the
/hookand/images/folders back into their proper directories. - Re-import your database dump (
.sqlfile) into your fresh database server to restore the web app's memory.
- Reinstall Container Station:
- Download Container Station from the QNAP App Center.
- Deploy Nginx Proxy Manager (NPM):
- Pull the
jc21/nginx-proxy-manager:latestimage and spin up the container just like you did for your successful test.
- Pull the
#Phase 4: Reconnecting the Signal Path
- Verify Router Port Forwarding:
- If your QNAP 1's IP address changed during the rebuild, update the Port 80 and Port 443 forwarding rules in your Synology Router to point to the new NPM IP.
- Recreate Proxy Hosts:
- Log into the fresh NPM Admin panel (Port 81).
- Recreate the routing rule for
www.claudioflute.livepointing to the QNAP admin page (Port 8080) to verify the outside signal still flows perfectly.
#Q34: Let me clarify. QNAP 1 will eventually be erased and set up as a single-drive sacrificial machine running ONLY NPM. Since QNAP 1 is now running ONE critical web app (Chaplaincy Admin), I'm migrating it to QNAP 2. My question was since QNAP 2 is ready running another set of containers for MariaDB and phpMyAdmin for other web apps hosting on QNAP 2, do I:
- Migrate the Chaplaincy Admin's MariaDB and phpMyAdmin containers from QNAP 1 to QNAP 2? Or
- Connect Chaplaincy Admin to the MariaDB and phpMyAdmin containers originally on QNAP 2?
#A: Thank you for the clarification! That architecture makes perfect sense now: QNAP 1 becomes your dedicated, sacrificial reverse proxy (NPM) in the DMZ, and QNAP 2 safely houses your actual web apps and databases in the Private LAN. That is an excellent, highly secure setup.
To answer your question: You should absolutely go with Option 2.
You should connect the Chaplaincy Admin app to the existing MariaDB and phpMyAdmin containers already running on QNAP 2.
Here is why Option 2 is the best practice:
#1. Resource Efficiency
Database engines like MariaDB are designed to handle dozens or even hundreds of separate databases simultaneously. Running a second MariaDB container and a second phpMyAdmin container on QNAP 2 would just waste your NAS's RAM and CPU for no added benefit.
#2. Avoiding Port Conflicts
If you migrated the containers from QNAP 1 to QNAP 2, they would try to use the same default ports (like 3306 for MariaDB) as the ones already running on QNAP 2. They would crash unless you manually remapped all the ports, which makes management messy.
#3. Centralized Management
By using the existing setup, you only have to log into one phpMyAdmin interface to manage, back up, and maintain the databases for all your web apps.
#How to execute Option 2:
Since you are already exporting the .sql file from QNAP 1, the migration is very straightforward:
- Create the New Home: Log into your existing phpMyAdmin on QNAP 2. Create a new, empty database (e.g., named
chaplaincy_admin). - Import the Memory: Select that new database, go to the Import tab, upload the
.sqlfile you just exported from QNAP 1, and hit Go. All your tables and data will populate. - Create a User (Optional but Recommended): In phpMyAdmin, go to the "Privileges" tab for that database and create a specific user and password just for the Chaplaincy app, granting it all privileges to that specific database.
- Update the App's Config: When you spin up the Chaplaincy Admin web app container on QNAP 2, open its configuration file (usually a
.env,config.php, orwp-config.phpfile). Update the database settings to point to:- Host: The IP address of QNAP 2 (or the container network name if they share a Docker network)
- Database Name: The new one you just created.
- User/Password: The credentials you set up.
Once you do this, Chaplaincy Admin will wake up on QNAP 2, read the existing MariaDB container, and pick up exactly where it left off!
Database migration.
#Q35: How can I rename the MariaDB container on QNAP 2? And if I find "/var/lib/mysql" in the container is not mounting to a real local folder but a long-strings volume, should I correct that?
#A: You have an incredibly sharp eye! Spotting that "long-strings volume" (which is called a Docker Anonymous Volume) is a huge catch, and it brings up a very important best practice for NAS setups.
To answer your questions directly: Yes, you should absolutely correct the volume mount, and because of how Docker works, correcting the volume will actually allow you to rename the container at the same time.
Here is exactly why this matters and how to do it safely.
#Why You Should Correct the "Long-Strings" Volume
When you see a long string of letters and numbers instead of a real folder path, it means Docker is managing the storage internally. While this works, it is dangerous on a NAS for two reasons:
- Backups are hard: QNAP's backup tools (like HBS 3) cannot easily see or back up Docker's hidden internal volumes.
- Data loss risk: If you ever accidentally delete the container, Docker might delete that anonymous volume with it, wiping out all your databases.
By changing it to a Bind Mount (a real folder like /Container/mariadb/data), your databases become visible files on your NAS that you can easily back up, and they are completely safe even if the container is deleted.
#How to Rename and Fix the Mount (The Safe Way)
Because Docker does not allow you to change the volume mount of an existing container, you have to recreate it. This is actually perfect, because creating the new one allows you to give it the new name you want!
Here is your step-by-step plan:
#Step 1: Back Up Everything (Crucial!)
Since you are about to replace the container, you need to save the data currently inside that hidden volume.
- Log into your phpMyAdmin on QNAP 2.
- Export every single database currently living on QNAP 2 (just like you did for QNAP 1). Save these
.sqlfiles to your computer.
#Step 2: Prepare the New Local Folder
- Open File Station on QNAP 2.
- Navigate to your Container folder (usually
/Container). - Create a new folder for your database (e.g.,
/Container/mariadb_data).
#Step 3: Note the Old Settings & Stop the Container
- Open Container Station on QNAP 2.
- Look at the settings of your current MariaDB container. Write down the Environment Variables (specifically the
MYSQL_ROOT_PASSWORD). - Stop the current MariaDB container. (Do not delete it yet, just in case).
#Step 4: Create the New, Renamed Container
- In Container Station, deploy a fresh MariaDB container.
- Name: Give it your desired new name (e.g.,
MariaDB-Main). - Environment Variables: Add the
MYSQL_ROOT_PASSWORDvariable and set it to the exact same password as the old one. - Volume Mounts: This is where you fix the issue!
- Add a volume mapping.
- Host path: Select the real folder you just created (
/Container/mariadb_data). - Container path: Type
/var/lib/mysql.
- Start the new container.
#Step 5: Restore Your Databases
- Log back into phpMyAdmin (it should automatically connect to the new MariaDB container since it's using the same port and root password).
- You will notice it is empty. Go to the Import tab and upload the
.sqlfiles you exported in Step 1. - Import the Chaplaincy Admin
.sqlfile you brought over from QNAP 1.
#The Result
You now have a perfectly named MariaDB container, all your databases are safely stored in a real folder that you can back up, and your Chaplaincy Admin app is ready to connect to its new home! Once you verify everything is working perfectly, you can safely delete the old, stopped MariaDB container.
#Q36: Here are the error messages when I import the QNAP 1 database into QNAP 2. Can you explain what do they mean? I saw some views are imported as tables and one view is entirely missing.
#A: This is a very common scenario when migrating databases, and you have provided the perfect log to diagnose it!
Here is exactly what those errors mean, why your views look like tables, and how to fix it easily.
#1. What does the #1064 error mean?
The core error is this line at the very bottom of your log:
#1064 - You have an error in your SQL syntax... near 'allselect '員工小組 (人次)' AS \Item`,count(case when year(`Count_cared...'`
If you look closely at the SQL code right before that error, you will see this text:
... = 2026union allselect '員工小組 (人次)' ...
The problem is missing spaces.
During the export process from QNAP 1, the system accidentally squished the words together. MariaDB expects to see 2026 UNION ALL SELECT, but instead, it sees 2026union allselect. Because it doesn't recognize "2026union" or "allselect" as valid SQL commands, it throws a syntax error and stops the import.
(All the other warnings like "Unrecognised keyword" and "Unexpected token" are just phpMyAdmin's syntax checker getting confused by those missing spaces).
#2. Why is one view missing?
The view that is entirely missing is 06-Report_接受服事員工(人次)統計. This is the exact view that the SQL script was trying to create when it hit the 2026union allselect error. Because the code crashed, MariaDB aborted the creation of that specific view.
#3. Why are the other views imported as tables?
This is a fascinating quirk of how SQL database exports work! When phpMyAdmin exports a database, it has to worry about "dependencies" (for example, what if View B relies on View A, but the script tries to create View B first?).
To prevent dependency crashes, the export script does a clever trick:
- At the top of the
.sqlfile, it creates "dummy tables" for all your views just to act as placeholders. - At the bottom of the
.sqlfile, it deletes those dummy tables and replaces them with the actual Views.
Because your script crashed in the middle of the file (due to the missing spaces), it never reached the bottom of the script. It never got the command to delete the dummy tables and build the real views, so you are left with the temporary placeholder tables.
#How to Fix It
The cleanest way to fix this is to correct the typo in your .sql file and import it again.
Step 1: Clean the slate on QNAP 2
- Go to phpMyAdmin on QNAP 2.
- Select the database you just tried to import into.
- Check all the tables/views and drop (delete) them so the database is completely empty again.
Step 2: Fix the .sql file
- Open the
.sqlfile you exported from QNAP 1 using a plain text editor (like Notepad++ on Windows or TextEdit on Mac). - Use the "Find" feature (Ctrl+F or Cmd+F) and search for:
2026union allselect - Add spaces so it looks like this:
2026 union all select - (Optional but recommended): Do a quick search for just
union allselector2026unionto make sure it didn't happen anywhere else in the file. - Save the file.
Step 3: Re-import
- Go back to phpMyAdmin on QNAP 2.
- Import the newly saved
.sqlfile.
Because the syntax error is fixed, the script will run all the way to the end. It will successfully create the missing view, and it will properly convert all those dummy tables into actual views!
#Q37: This time is better after fixing the .sql file. But I see this error:
CREATE ALGORITHM=UNDEFINED DEFINER=`root`@`%` SQL SECURITY DEFINER VIEW `Nochat_Service_Items`  AS SELECT `set_definition`.`name` AS `Item` FROM `set_definition` WHERE `set_definition`.`chk_nochat` = 1 ORDER BY `set_definition`.`name` AS `ASCorder` ASC;

#1064 - You have an error in your SQL syntax; check the manual that corresponds to your MariaDB server version for the right syntax to use near 'AS `ASCorder` ASC' at line 1.#A: You are making great progress! You successfully bypassed the first roadblock, and this new error is actually much simpler to fix.
#What does this error mean?
The error #1064 is popping up because of this specific part at the very end of your SQL statement:
ORDER BY \set_definition`.`name` AS `ASCorder` ASC`
In SQL, the ORDER BY command is used to sort your results. However, you cannot use the word AS (which creates an alias or nickname) inside an ORDER BY clause.
The database engine expects you to just tell it the column name and the direction to sort (ASC for ascending). When it sees AS \ASCorder`` sitting in the middle of the sorting instructions, it gets confused and throws a syntax error.
#How to Fix It
Just like last time, we just need to make a quick edit to your .sql file.
Step 1: Fix the .sql file
- Open your
.sqlfile in your text editor. - Use the "Find" feature to search for this exact text:
AS \ASCorder` ASC` - Simply delete the
AS \ASCorder`part, so the end of that line looks like this:ORDER BY `set_definition`.`name` ASC;` - Save the file.
(Note: The full corrected line should look like this: CREATE ALGORITHM=UNDEFINED DEFINER=\root`@`%` SQL SECURITY DEFINER VIEW `Nochat_Service_Items` AS SELECT `set_definition`.`name` AS `Item` FROM `set_definition` WHERE `set_definition`.`chk_nochat` = 1 ORDER BY `set_definition`.`name` ASC;`)
Step 2: Clean the slate on QNAP 2 Because the script crashed again before finishing, you likely have those "dummy tables" stuck in your database again.
- Go to phpMyAdmin on QNAP 2.
- Select your database.
- Check all the tables/views and drop (delete) them so the database is completely empty.
Step 3: Re-import
- Import your freshly saved
.sqlfile.
Since the sorting syntax is now perfectly standard, MariaDB should read right past it and finally finish building all your real views at the bottom of the script!
#Q38: It's successfully imported. I want to create a new DB user for the database. Should I just check "Data" for Global privileges?
#A: That is wonderful news! I am glad the import was successful.
To answer your question: No, you should NOT check "Data" under Global privileges. In fact, you should leave the entire "Global privileges" section completely blank (unchecked).
Here is why: Global privileges apply to every single database on your QNAP 2. If you grant Global "Data" privileges, the Chaplaincy Admin web app will have permission to read, modify, and delete data in other databases hosted on QNAP 2. If the web app ever gets compromised, the attacker would have the keys to your entire database server.
Since you are building a highly secure network, you want to use the Principle of Least Privilege. The web app should only have access to its own specific database, and nothing else.
#The Correct Way to Create the User in phpMyAdmin:
- Select the Database First: On the left-hand sidebar of phpMyAdmin, click specifically on your new Chaplaincy Admin database.
- Go to Privileges: Click the Privileges tab at the top of the screen.
- Add User: Click Add user account (near the bottom).
- Login Information:
- Type in your desired Username.
- Set the Host name to Any host (
%) or the specific IP of the container network. - Type in a strong Password.
- Database for user account: You should see a checkbox that says "Grant all privileges on database
[your_database_name]". Make sure this is checked. - Global Privileges: Scroll past this section and make sure absolutely nothing is checked here.
- Save: Scroll to the bottom and click Go.
By doing it this way, phpMyAdmin automatically grants the user the necessary Data (SELECT, INSERT, UPDATE, DELETE) and Structure (CREATE, ALTER, INDEX) privileges, but strictly locks them inside that one single database. Your other apps on QNAP 2 remain perfectly safe!
#Q39: I'm importing another database. This time the error is:
2 errors were found during analysis.

A symbol name was expected! (near ")" at position 36)
At least one column definition was expected. (near ")" at position 36)
SQL query: Copy

CREATE TABLE `01_song_techniques` ( );

MySQL said: Documentation

#1064 - You have an error in your SQL syntax; check the manual that corresponds to your MariaDB server version for the right syntax to use near ')' at line 2.#A: This is another classic phpMyAdmin export quirk, and since you already know about "dummy tables" from your last database, you will understand exactly what is happening here!
#What does the error mean?
The error is complaining about this exact line:
CREATE TABLE \01_song_techniques` ( );`
In SQL, a table must have at least one column. You cannot create a completely empty table. MariaDB sees the empty parentheses ( ) and throws a syntax error because it expects to see column names inside them.
#Why did this happen?
Just like in your previous database, 01_song_techniques is actually a View.
To prevent dependency errors, phpMyAdmin tried to create a temporary "dummy table" at the top of your .sql file. Usually, phpMyAdmin puts a fake column inside the parentheses (like (dummyINT)), but due to a small glitch during the export, it left the parentheses completely empty.
#How to Fix It
Since this is just a temporary placeholder that gets deleted and replaced by the real View at the bottom of the file anyway, we just need to give MariaDB a fake column to make it happy.
Step 1: Fix the .sql file
- Open your
.sqlfile in your text editor. - Search for:
CREATE TABLE \01-song_techniques`` - You will see the empty parentheses:
( );(or it might be spread across a couple of lines). - Simply add a fake column inside the parentheses so it looks like this:
CREATE TABLE \01_song_techniques` ( `dummy_column` INT );` - (Optional but recommended): Do a quick search for
( );just in case there are any other empty dummy tables in the file. If you find any, fix them the exact same way. - Save the file.
Step 2: Clean the slate and Re-import
- Go to phpMyAdmin on QNAP 2.
- Select your database and Drop (delete) any tables/views that were partially imported so it is completely empty again.
- Import your newly saved
.sqlfile.
The script will now successfully create the dummy table with its fake column, continue running the rest of your data, and then properly replace it with your actual 01_song_techniques View at the end!
Migrating app and data.
#Q40: It goes well after removing the views. I've just copy the web app directory from QNAP 1 to QNAP 2. How can I ensure web server of QNAP 2 has RW access to the /images folder? It seems that QNAP doesn't have a HTTP user.
#Q41: The httpdusr user can't be found from the UI. Only an "everyone" user is found under Local Groups.
#A: Ah, you have run into one of QNAP's classic quirks! You are absolutely right—QNAP intentionally hides system accounts like httpdusr from the standard File Station UI to prevent regular users from accidentally messing with system permissions.
Since you are building a secure network and shouldn't just give "everyone" (which is essentially a chmod 777 free-for-all) read/write access, the best and most secure way to assign this is via SSH.
Since you are already comfortable managing VLANs and Docker, using SSH will be very straightforward for you. Here is how to do it in just a couple of minutes:
#Step 1: Enable SSH on QNAP 2 (If not already enabled)
- Go to Control Panel > Network & File Services > Telnet / SSH.
- Check Allow SSH connection (default port is usually 22).
- Click Apply.
#Step 2: Connect via SSH
Open your terminal (Mac/Linux) or Command Prompt/PowerShell/PuTTY (Windows) and type:
ssh admin@<IP_OF_QNAP_2>(Note: If you disabled the default admin account, use your main administrator username instead).
#Step 3: Apply the Permissions
QNAP stores its web files in the /share/Web/ directory. You will use the chown (change owner) command to give httpdusr ownership of those specific folders.
Run these commands (replace your_app_folder with the actual name of your web app's directory):
For the images folder:
chown -R httpdusr:administrators /share/Web/your_app_folder/imagesFor the hook folder (from your backup reminder!):
chown -R httpdusr:administrators /share/Web/your_app_folder/hook(The -R flag means "recursive", so it applies to all files currently inside those folders too).
#Step 4: Verify and Close
If you want to verify it worked, you can type:
ls -l /share/Web/your_app_folder/You should now see httpdusr listed as the owner next to the images and hook folders.
Once you are done, simply type exit to close the SSH session. (And for good security practice on your Admin LAN, you can go back into the QNAP Control Panel and disable SSH until the next time you need it!).
Your web app will now have the exact Read/Write permissions it needs without exposing the folders to "everyone".
#Q42: Then, for the config.php of the web app, should I set as as follow?
    $dbServer = '192.168.1.21';
    $dbUsername = 'nlhcm_user';
    $dbPassword = 'xxxxxx';
    $dbDatabase = 'nlhcm';
    $dbPort = '3306';
    $appURI = 'http://192.168.1.249/nlhcm/';
$host = 'https://admin.nlt-chaplaincy.org/';#Q43: Yes, I confirm the IPs of QNAP 2 and the MariaDB container are correct. Since I've not yet re-installed QNAP 1 and setup NPM, I visited http://192.168.1.249/nlhcm/ and login, then it shows "Not Found" and the address bar shows "http://192.168.1.249/http://192.168.1.249/nlhcm/index.php?loginFailed=1&browser_window_id=d60cf2a87c31"
If I want to test the system before re-installing QNAP 1, should I modify config.php first?
#A: Yes, you should definitely modify config.php temporarily! Testing the system locally before setting up NPM is a very smart move to ensure the migration worked perfectly.
The strange URL duplication you are seeing (http://192.168.1.249/http://192.168.1.249...) is a classic redirect issue. Because you are accessing the site directly via IP, the PHP application is getting confused. It is likely trying to build the redirect URL after your login attempt by combining the current server address with your $appURI variable, which results in the http:// part being doubled up.
To fix this for your local testing, you should change the $host and $appURI variables so they use relative paths and match your local IP.
Change those two lines in your config.php to this:
    $appURI = '/nlhcm/';
    $host = 'http://192.168.1.249';
Why this works:
- By setting
$appURIto just/nlhcm/, the application will no longer accidentally double-up thehttp://192.168.1.249part when it redirects you after a login attempt. - By setting
$hostto your local IP, any absolute links the web app generates will correctly point to your local QNAP 2 server instead of trying to force you out to thehttps://admin.nlt-chaplaincy.org/domain (which isn't routed yet since NPM is down).
Once you finish testing and are ready to set up QNAP 1 with NPM: Don't forget to change these back to your production settings! When NPM is handling the reverse proxy, you will want them set to:
    $appURI = '/nlhcm/';
    $host = 'https://admin.nlt-chaplaincy.org';
(Note: It is usually best practice to keep $appURI as just the folder path /nlhcm/ even in production, unless your specific web app strictly requires the full URL in that variable).
Try making that quick change and logging in again!
#Q44: I tested what works is the following, slightly different from what you said:
$appURI = 'nlhcm/';
$host = 'http://192.168.1.249';#A: Ah, that makes perfect sense! Excellent catch.
What is happening under the hood is that your web app's PHP code is likely combining the variables together with a slash already included in the code (something like $host . '/' . $appURI). When you used my suggestion with the leading slash (/nlhcm/), it probably resulted in a double slash (http://192.168.1.249//nlhcm/), which broke the routing. By omitting the leading slash (nlhcm/), it pieces the URL together perfectly!
When you are ready to switch back to production behind Nginx Proxy Manager, just remember to keep that exact same format:
$appURI = 'nlhcm/';
$host = 'https://admin.nlt-chaplaincy.org';
Since you can now log in and the system is working locally, congratulations! You have successfully migrated the Chaplaincy Admin web app, safely imported its database, and locked down the permissions on QNAP 2.
Are you ready to move on to the next phase of your master plan? If I recall correctly, your next step is to completely erase QNAP 1, physically remove two drives to make it a single-drive machine, and set it up as your sacrificial reverse proxy server running only NPM (jc21/nginx-proxy-manager:latest).
Let me know if you are ready to start wiping QNAP 1 or if there is anything else you want to test on QNAP 2 first!
Fixing the mail function.
#Q45: Before erasing QNAP 1, I've tested some basic feature of the web app. What fails is the email sending feature. The web app was written with AppGini with custom hooks. The contact_book.php hook should be sending email to the chosen person-in-charge when a Contact Book record is added successfully.
In my test just now, the CB record has been save but I can't receive any email. The error log says "[2026-11-01 16:24:13] contact_book_after_insert called for ID 554[2026-11-01 16:24:13] Failed to send email to liclaudio38@gmail.com[2026-11-01 16:24:13] Failed to send assignee email to liclaudio38@gmail.com".
#A: This is a very common issue when migrating web applications to a new server. The good news is that your PHP code is perfectly fine!
The reason it is failing is because the PHP mail() function relies on the underlying server's mail system (MTA) to actually route and send the emails. On QNAP 1, the server was likely configured to send outgoing emails, but QNAP 2's PHP environment doesn't currently know how to route them.
You have two ways to fix this. Option 1 is highly recommended because it is much more reliable and bypasses QNAP's server settings entirely.
#Option 1: Use AppGini's Built-in Mailer (Recommended)
Instead of using PHP's native mail() function, AppGini has a built-in sendmail() function. This is vastly superior because it uses PHPMailer under the hood, allowing you to configure SMTP (like Gmail, SendGrid, or Office365) directly inside the AppGini Admin Area, completely independent of the QNAP server settings.
Step 1: Update your hook code
Replace the native mail() calls with AppGini's sendmail() array format. Here is how you modify the email sending blocks in your code:
For the Creator Email:
        // Replace the $headers and mail() function with this:
        $mail_creator = [
            'to' => $to,
            'subject' => $subject,
            'message' => $message
        ];
        $send_result = sendmail($mail_creator);
        if ($send_result !== true) {
            error_log("[$timestamp] Failed to send email to $to. Error: $send_result", 3, $debug_log_file);
        }
For the Assignee Email:
                // Replace the mail() function with this:
                $mail_assignee = [
                    'to' => $assignee_data['email'],
                    'subject' => "[Chaplaincy Admin] {$assignee_data['custom1']}, 你有一個新任務!",
                    'message' => $message
                ];
                $send_result2 = sendmail($mail_assignee);
                if ($send_result2 !== true) {
                    error_log("[$timestamp] Failed to send assignee email to {$assignee_data['email']}. Error: $send_result2", 3, $debug_log_file);
                }
Step 2: Configure SMTP in AppGini
- Log into your Chaplaincy Admin web app as the Admin.
- Go to the Admin Area.
- Navigate to Utilities -> Mail Settings.
- Enter your SMTP details (e.g., your Gmail SMTP settings, port 465 or 587, and your App Password).
- Send a test email from that page to confirm it works. Once that test passes, your hook will work perfectly!
#Option 2: Configure QNAP 2's System Mailer (If you must use native mail())
If you prefer not to change your code and want to keep using the native mail() function, you must configure QNAP 2 to handle outgoing mail.
- Log into the QNAP 2 web interface.
- Open Control Panel -> System -> Notification Center.
- Click on Service Account and Device Pairing (or SMTP settings, depending on your QTS version).
- Add an SMTP account (like your
liclaudio38@gmail.comaccount using a Google App Password). - Ensure this account is set as the primary sender for the NAS.
- Note: QNAP's internal routing for PHP's
mail()function can sometimes be finicky depending on the QTS version. If configuring the Notification Center doesn't immediately fix the PHPmail()function, you will need to use Option 1.
I highly recommend taking a few minutes to switch to AppGini's sendmail() (Option 1). It gives you much better error logging (it will actually tell you why an email failed, like "Invalid Password" instead of just returning false), and it ensures your app remains portable no matter what server it runs on in the future!
#Q46: I have already setup SMTP in QTS and a test mail has been succesfully sent. I tried Option 2 and I got error that says:
Test email output
2026-11-01 08:41:56 Connection: opening to smtp.gmail.com:25, timeout=300, options=array()
2026-11-01 08:44:07 Connection failed. Error #2: stream_socket_client(): Unable to connect to smtp.gmail.com:25 (Network is unreachable) [/share/CACHEDEV1_DATA/Web/nlhcm/resources/lib/PHPMailer/PHPMailer/SMTP.php line 396]
2026-11-01 08:44:07 SMTP ERROR: Failed to connect to server: Network is unreachable (101)
2026-11-01 08:44:07 SMTP connect() failed. https://github.com/PHPMailer/PHPMailer/wiki/Troubleshooting
Should I use my gmail login for the SMTP username/password? I saw the option "Method of sending emails: PHP mail() | SMTP" on the page.
#A: It looks like you are actually on the AppGini "Mail Settings" page, which is great! You are setting up Option 1 (using AppGini's built-in PHPMailer), which is the best approach.
Based on the PHPMailer troubleshooting guide you provided, we can see exactly why it is failing.
#1. The Port Error (Network is unreachable)
The error log shows: opening to smtp.gmail.com:25.
You are trying to connect to Gmail using Port 25. As the troubleshooting guide mentions, port 25 is unencrypted and is almost always blocked by ISPs to prevent spam. Gmail requires a secure connection.
How to fix this in the AppGini Mail Settings:
- Method of sending emails: Choose SMTP (Do not choose PHP mail()).
- SMTP Server:
smtp.gmail.com - Encryption: Choose TLS (or STARTTLS).
- Port: Change this to 587. (If TLS/587 doesn't work, try SSL on port 465).
#2. The Username and Password Question
You asked if you should use your Gmail login for the username and password.
- Username: Yes, use your full Gmail address (e.g.,
liclaudio38@gmail.com). - Password: No, you cannot use your normal Gmail password.
As stated in the PHPMailer Wiki you shared:
"Starting from May 30th 2022, Google has suspended password based logins altogether. This means that you will either have to implement XOAUTH2 authentication, or create app passwords."
How to get an App Password:
- Go to your Google Account settings (myaccount.google.com).
- Go to Security on the left menu.
- Ensure 2-Step Verification is turned on.
- Search for App passwords in the settings search bar (or find it under the 2-Step Verification menu).
- Generate a new App Password (it will be a 16-character code).
- Copy and paste that 16-character code into the SMTP Password field in your AppGini Mail Settings.
Once you change the port to 587, set the encryption to TLS, and use a Google App Password, click the button to send a test email again. It should go through perfectly!
#Q47: It's very weird that I can't find any "$mail-creator" string in my hook file. Attached is the full hook file. Can you tell which lines I have to update?
#A: Ah, I completely understand the confusion! I apologize for not being clearer.
The string $mail_creator was not originally in your file. That was a new variable I was suggesting you add to replace the old mail() function.
Looking at your full file, I can see there are actually four different places where your code sends emails using the old mail() function:
- Sending to the Creator (after insert)
- Sending to the Assignee (after insert)
- Sending a Reassignment email (after update)
- Sending a Reminder email (after update)
To make this as easy as possible, I have updated the entire file for you. I removed the old $headers and mail() lines and replaced them with AppGini's sendmail() function in all four locations. I also removed mb_convert_encoding for the subjects, as AppGini's mailer handles UTF-8 natively!
You can completely replace the contents of your hooks/contact_book.php file with the code below:
<?php
// File: hooks/contact_book.php
// Version: 1.18.8
if (session_status() == PHP_SESSION_NONE) {
    session_start();
}

// Set timezone for logging
date_default_timezone_set('Asia/Hong_Kong');

function contact_book_init(&$options, $memberInfo, &$args) {
    return TRUE;
}

function contact_book_header($contentType, $memberInfo, &$args) {
    $header = '';

    switch ($contentType) {
        case 'tableview':
            $header = '';
            break;
        case 'detailview':
            $header = '';
            break;
        case 'tableview+detailview':
            $header = '';
            break;
        case 'print-tableview':
            $header = '';
            break;
        case 'print-detailview':
            $header = '';
            break;
        case 'filters':
            $header = '';
            break;
    }

    return $header;
}

function contact_book_footer($contentType, $memberInfo, &$args) {
    $footer = '';

    switch ($contentType) {
        case 'tableview':
            $footer = '';
            break;
        case 'detailview':
            $footer = '';
            break;
        case 'tableview+detailview':
            $footer = '';
            break;
        case 'print-tableview':
            $footer = '';
            break;
        case 'print-detailview':
            $footer = '';
            break;
        case 'filters':
            $footer = '';
            break;
    }

    return $footer;
}

function contact_book_before_insert(&$data, $memberInfo, &$args) {
    // Initialize last_id to NULL (will be set after insert)
    $data['last_id'] = NULL;
    return TRUE;
}

function contact_book_after_insert($data, $memberInfo, &$args) {
    $debug_log_file = '/share/Public/php_errors.log';
    $timestamp = date('Y-m-d H:i:s');
    error_log("[$timestamp] contact_book_after_insert called for ID {$data['id']}", 3, $debug_log_file);

    // Update last_id to match the inserted ID
    $update_query = "UPDATE contact_book SET last_id = '" . makeSafe($data['id']) . "' WHERE id = '" . makeSafe($data['id']) . "'";
    sql($update_query, $eo);
    if ($eo && !empty($eo['error'])) {
        error_log("[$timestamp] Failed to update last_id for contact_book ID {$data['id']}: " . $eo['error'], 3, $debug_log_file);
    }

    // Send email to creator
    $requested_by = !empty($data['requested_by']) ? $data['requested_by'] : $memberInfo['username'];
    $query = "SELECT u.email, u.custom1, g.name AS group_name
              FROM membership_users u
              LEFT JOIN membership_groups g ON u.groupID = g.groupID
              WHERE u.memberID = '" . makeSafe($requested_by) . "'";
    $user_info = sql($query, $eo);
    if ($eo && !empty($eo['error'])) {
        error_log("[$timestamp] Failed to fetch user info: " . $eo['error'], 3, $debug_log_file);
        return TRUE;
    }

    $creator_data = db_fetch_assoc($user_info);
    $creator_email = $creator_data['email'] ?? '';
    $creator_name = $creator_data['custom1'] ?? $requested_by;
    $user_group = $creator_data['group_name'] ?? '';

    $themes = ($user_group === 'Manager') ? "'Management', 'Work', 'Scripture'" : ($user_group === 'Staff' ? "'Work', 'Scripture'" : "'Work'");
    if ($full_quote = sqlValue("SELECT CONCAT(message, '<br>—— ', author) FROM tip_and_quote WHERE type IN ($themes) ORDER BY RAND() LIMIT 1")) {
        $full_quote = mb_convert_encoding($full_quote, 'UTF-8', 'auto');
        $to = $creator_email;
        $subject = "[Chaplaincy Admin] $creator_name, 你已經成功新增任務!";
        $message = "<html><body style=\"font-family: Arial, sans-serif;\"><p>$creator_name 你好,</p><p></p><p>你已經成功新增了一項任務!</p><p></p><p>以下是一個隨機小Tips,助你提升工作效率:</p><p></p><p>$full_quote</p><p></p><p>請繼續努力,謝謝!</p><p></p><p>聯絡簿 ID: <a href=\"https://admin.nlt-chaplaincy.org/contact_book_view.php?SelectedID={$data['id']}\">{$data['id']}</a><br><i>(按 ID 瀏覽任務詳情。如系統顯示 Sorry! You don't have permission...,請登入即可。)</i></p></body></html>";

        // UPDATED: Using AppGini's sendmail()
        $mail_creator = [
            'to' => $to,
            'subject' => $subject,
            'message' => $message
        ];
        $send_result = sendmail($mail_creator);
        if ($send_result !== true) {
            error_log("[$timestamp] Failed to send email to $to. Error: $send_result", 3, $debug_log_file);
        }
    }

    // Send email to assignee
    $assignee_id = $data['personnel_filtered'] ?? '';
    if ($assignee_id) {
        $assignee_login_id = sqlValue("SELECT login_id FROM personnel WHERE id = '" . makeSafe($assignee_id) . "'");
        if ($assignee_login_id) {
            $assignee_data = db_fetch_assoc(sql("SELECT email, custom1 FROM membership_users WHERE memberID = '" . makeSafe($assignee_login_id) . "'", $eo));
            if ($assignee_data['email']) {
                $task_description = strip_tags(htmlspecialchars_decode($data['request'] ?? 'No description', ENT_QUOTES));
                $task_description = mb_substr($task_description, 0, 40, 'UTF-8') . (mb_strlen($task_description, 'UTF-8') > 40 ? '...' : '');
                $message = "<html><body style=\"font-family: Arial, sans-serif;\"><p>{$assignee_data['custom1']} 你好,</p><p></p><p>$creator_name 為你指派了一項新任務!</p><p></p><p>任務詳情:<br>$task_description</p><p></p><p>請安排時間執行,並於完成任務後提交回條。謝謝!</p><p></p><p>聯絡簿 ID: <a href=\"https://admin.nlt-chaplaincy.org/contact_book_view.php?SelectedID={$data['id']}\">{$data['id']}</a><br><i>(按 ID 瀏覽任務詳情。如系統顯示 Sorry! You don't have permission...,請登入即可。)</i></p></body></html>";

                // UPDATED: Using AppGini's sendmail()
                $mail_assignee = [
                    'to' => $assignee_data['email'],
                    'subject' => "[Chaplaincy Admin] {$assignee_data['custom1']}, 你有一個新任務!",
                    'message' => $message
                ];
                $send_result2 = sendmail($mail_assignee);
                if ($send_result2 !== true) {
                    error_log("[$timestamp] Failed to send assignee email to {$assignee_data['email']}. Error: $send_result2", 3, $debug_log_file);
                }
            }
        }
    }

    return TRUE;
}

function contact_book_before_update($data, $memberInfo, &$args) {
    $_SESSION['contact_book_redirect_t'] = $_GET['t'] ?? '';
    $_SESSION['contact_book_original_personnel_filtered'] = sqlValue("SELECT personnel_filtered FROM contact_book WHERE id = '" . makeSafe($data['id']) . "'");
    return TRUE;
}

function contact_book_after_update($data, $memberInfo, &$args) {
    $debug_log_file = '/share/Public/php_errors.log';
    $timestamp = date('Y-m-d H:i:s');
    error_log("[$timestamp] contact_book_after_update for ID {$data['id']}", 3, $debug_log_file);
    error_log("[$timestamp] contact_book_after_update: Data - " . json_encode($data), 3, $debug_log_file);

    // Validate contact_book record
    if (!sqlValue("SELECT id FROM contact_book WHERE id = '" . makeSafe($data['id']) . "'")) {
        error_log("[$timestamp] Error: ID {$data['id']} not found in contact_book", 3, $debug_log_file);
        return TRUE;
    }

    // Helper: Update Reply Slips
    $updateReplySlips = function ($contact_book_id, $is_deferred = false, $is_completed = false) use ($debug_log_file, $timestamp) {
        $deferred = $is_deferred ? 1 : 0;
        $completed = $is_completed ? 1 : 0;
        // Only update records with non-NULL last_id
        $query = "UPDATE reply_slip SET chk_deferred = $deferred, chk_completed = $completed
                  WHERE last_id = '" . makeSafe($contact_book_id) . "' AND last_id IS NOT NULL";
        sql($query, $eo);
        if ($eo && !empty($eo['error'])) {
            error_log("[$timestamp] Failed to update reply_slip for ID $contact_book_id: " . $eo['error'], 3, $debug_log_file);
            return false;
        }
        error_log("[$timestamp] Updated reply_slip for ID $contact_book_id: chk_deferred=$deferred, chk_completed=$completed", 3, $debug_log_file);
        return true;
    };

    // Helper: Archive Record
    $archiveRecord = function ($data) use ($debug_log_file, $updateReplySlips, $timestamp) {
        $query = "INSERT INTO task_archive (original_creator, original_date, original_request, original_illustration, original_id) VALUES (
            '" . makeSafe($data['requested_by']) . "',
            '" . makeSafe($data['date_requested']) . "',
            '" . makeSafe($data['request']) . "',
            '" . makeSafe($data['illustration']) . "',
            '" . makeSafe($data['id']) . "'
        )";
        sql($query, $eo);
        if ($eo && !empty($eo['error'])) {
            error_log("[$timestamp] Failed to archive ID {$data['id']}: " . $eo['error'], 3, $debug_log_file);
            return false;
        }
        $updateReplySlips($data['id'], false, true);
        error_log("[$timestamp] Archived ID {$data['id']}", 3, $debug_log_file);
        return true;
    };

    // Handle Status Changes
    if (isset($data['status'])) {
        error_log("[$timestamp] Processing status change for ID {$data['id']}", 3, $debug_log_file);
        if ($data['status'] === '已完成') {
            if ($archiveRecord($data)) {
                sql("DELETE FROM contact_book WHERE id = '" . makeSafe($data['id']) . "'", $eo);
                if ($eo && !empty($eo['error'])) {
                    error_log("[$timestamp] Failed to delete contact_book ID {$data['id']}: " . $eo['error'], 3, $debug_log_file);
                }
            }
            redirect('contact_book_view.php?t=' . ($_SESSION['contact_book_redirect_t'] ?? time()));
            exit;
        } elseif ($data['status'] === '遲啲處理') {
            $project = !empty($data['project']) ? "'" . makeSafe($data['project']) . "'" : 'NULL';
            $query = "INSERT INTO future_camp (requested_by, date_requested, project, idea_and_need, illustration, attachment, status, original_id, last_id) VALUES (
                '" . makeSafe($data['requested_by']) . "',
                '" . makeSafe($data['date_requested']) . "',
                $project,
                '" . makeSafe($data['request']) . "',
                '" . makeSafe($data['illustration']) . "',
                '" . makeSafe($data['attachment']) . "',
                '待處理',
                '" . makeSafe($data['id']) . "',
                '" . makeSafe($data['last_id'] ?? $data['id']) . "'
            )";
            sql($query, $eo);
            if ($eo && !empty($eo['error'])) {
                error_log("[$timestamp] Failed to move ID {$data['id']} to future_camp: " . $eo['error'], 3, $debug_log_file);
                return TRUE;
            }
            $future_id = sqlValue("SELECT LAST_INSERT_ID()");
            $updateReplySlips($data['id'], true, false);
            sql("DELETE FROM contact_book WHERE id = '" . makeSafe($data['id']) . "'", $eo);
            if ($eo && !empty($eo['error'])) {
                error_log("[$timestamp] Failed to delete contact_book ID {$data['id']}: " . $eo['error'], 3, $debug_log_file);
            }
            error_log("[$timestamp] Moved ID {$data['id']} to future_camp ID $future_id", 3, $debug_log_file);
            redirect('contact_book_view.php?t=' . ($_SESSION['contact_book_redirect_t'] ?? time()));
            exit;
        }
    }

    // Fetch the current personnel_filtered from the database to compare
    $current_personnel = sqlValue("SELECT personnel_filtered FROM contact_book WHERE id = '" . makeSafe($data['id']) . "'") ?: '';
    $original_personnel = $_SESSION['contact_book_original_personnel_filtered'] ?? '';

    // Handle Reassignment
    if (isset($data['status']) && $data['status'] === '活躍中') {
        error_log("[$timestamp] Checking reassignment for ID {$data['id']}", 3, $debug_log_file);
        error_log("[$timestamp] Original personnel (from session): $original_personnel, Current personnel (from DB): $current_personnel, New personnel (from data): {$data['personnel_filtered']}", 3, $debug_log_file);

        // Only proceed if personnel_filtered has actually changed and is not empty
        if ($original_personnel !== '' && $original_personnel !== $data['personnel_filtered'] && !empty($data['personnel_filtered']) && $current_personnel !== $data['personnel_filtered']) {
            error_log("[$timestamp] Personnel changed, sending reassignment email for ID {$data['id']}", 3, $debug_log_file);
            $creator_name = sqlValue("SELECT custom1 FROM membership_users WHERE memberID = '" . makeSafe($data['requested_by']) . "'") ?: $data['requested_by'];
            $assignee_id = $data['personnel_filtered'];
            $assignee_login_id = sqlValue("SELECT login_id FROM personnel WHERE id = '" . makeSafe($assignee_id) . "'");
            if ($assignee_login_id) {
                $assignee_data = db_fetch_assoc(sql("SELECT email, custom1 FROM membership_users WHERE memberID = '" . makeSafe($assignee_login_id) . "'", $eo));
                if ($assignee_data['email']) {
                    $task_description = strip_tags(htmlspecialchars_decode($data['request'] ?? 'No description', ENT_QUOTES));
                    $task_description = mb_substr($task_description, 0, 40, 'UTF-8') . (mb_strlen($task_description, 'UTF-8') > 40 ? '...' : '');
                    $message = "<html><body style=\"font-family: Arial, sans-serif;\"><p>{$assignee_data['custom1']} 你好,</p><p></p><p>$creator_name 為你指派了一項新任務!</p><p></p><p>任務詳情:<br>$task_description</p><p></p><p>請安排時間執行,並於完成任務後提交回條。謝謝!</p><p></p><p>聯絡簿 ID: <a href=\"https://admin.nlt-chaplaincy.org/contact_book_view.php?SelectedID={$data['id']}\">{$data['id']}</a><br><i>(按 ID 瀏覽任務詳情。如系統顯示 Sorry! You don't have permission...,請登入即可。)</i></p></body></html>";

                    // UPDATED: Using AppGini's sendmail()
                    $mail_reassign = [
                        'to' => $assignee_data['email'],
                        'subject' => "[Chaplaincy Admin] {$assignee_data['custom1']}, 你有一個新任務!",
                        'message' => $message
                    ];
                    $send_result3 = sendmail($mail_reassign);
                    if ($send_result3 !== true) {
                        error_log("[$timestamp] Failed to send reassignment email to {$assignee_data['email']}. Error: $send_result3", 3, $debug_log_file);
                    }
                }
            }
        } else {
            error_log("[$timestamp] No reassignment needed for ID {$data['id']}", 3, $debug_log_file);
        }
    }

    // Handle Reminder
    if (isset($data['chk_reminder']) && $data['chk_reminder'] == 1 && $data['status'] === '活躍中') {
        error_log("[$timestamp] Sending reminder for ID {$data['id']}", 3, $debug_log_file);
        $creator_name = sqlValue("SELECT custom1 FROM membership_users WHERE memberID = '" . makeSafe($data['requested_by']) . "'") ?: $data['requested_by'];
        $assignee_id = $data['personnel_filtered'] ?? '';
        if ($assignee_id) {
            $assignee_login_id = sqlValue("SELECT login_id FROM personnel WHERE id = '" . makeSafe($assignee_id) . "'");
            if ($assignee_login_id) {
                $assignee_data = db_fetch_assoc(sql("SELECT email, custom1 FROM membership_users WHERE memberID = '" . makeSafe($assignee_login_id) . "'", $eo));
                if ($assignee_data['email']) {
                    $task_description = strip_tags(htmlspecialchars_decode($data['request'] ?? 'No description', ENT_QUOTES));
                    $task_description = mb_substr($task_description, 0, 40, 'UTF-8') . (mb_strlen($task_description, 'UTF-8') > 40 ? '...' : '');
                    $message = "<html><body style=\"font-family: Arial, sans-serif;\"><p>{$assignee_data['custom1']} 你好,</p><p></p><p>$creator_name 想提醒你以下的工作尚未提交回條。</p><p></p><p>任務詳情:<br>$task_description</p><p></p><p>請務必於限期前安排時間處理,並於完成任務後提交回條。如有任何困難,請盡早溝通,以免延誤相關工作。感謝你的配合!</p><p></p><p>聯絡簿 ID: <a href=\"https://admin.nlt-chaplaincy.org/contact_book_view.php?SelectedID={$data['id']}\">{$data['id']}</a><br><i>(按 ID 瀏覽任務詳情。如系統顯示 Sorry! You don't have permission...,請登入即可。)</i></p></body></html>";

                    // UPDATED: Using AppGini's sendmail()
                    $mail_reminder = [
                        'to' => $assignee_data['email'],
                        'subject' => "[Chaplaincy Admin] {$assignee_data['custom1']}, 你有未回覆的任務!",
                        'message' => $message
                    ];
                    $send_result4 = sendmail($mail_reminder);
                    if ($send_result4 === true) {
                        sql("UPDATE contact_book SET chk_reminder = 0 WHERE id = '" . makeSafe($data['id']) . "'", $eo);
                        if ($eo && !empty($eo['error'])) {
                            error_log("[$timestamp] Failed to reset chk_reminder for ID {$data['id']}: " . $eo['error'], 3, $debug_log_file);
                        }
                    } else {
                        error_log("[$timestamp] Failed to send reminder email to {$assignee_data['email']}. Error: $send_result4", 3, $debug_log_file);
                    }
                }
            }
        }
        redirect('contact_book_view.php?t=' . ($_SESSION['contact_book_redirect_t'] ?? time()));
        exit;
    }

    // Clear session variables to prevent stale comparisons in future updates
    unset($_SESSION['contact_book_original_personnel_filtered']);
    unset($_SESSION['contact_book_redirect_t']);
    return TRUE;
}

function contact_book_before_delete($selectedID, &$skipChecks, $memberInfo, &$args) {
    return TRUE;
}

function contact_book_after_delete($selectedID, $memberInfo, &$args) {}

function contact_book_dv($selectedID, $memberInfo, &$html, &$args) {}

function contact_book_csv($query, $memberInfo, &$args) {
    return $query;
}

function contact_book_batch_actions(&$args) {
    return [];
}
Once you save this file, as long as your AppGini Mail Settings are configured with Port 587, TLS, and your Google App Password, all four of these email triggers will work perfectly!
#Q48: The contact-book hook has been tested okay! Can you check if these two extra hooks need update?
#A: Thinking...
Refining Contact Book Hook
I've successfully transitioned the
contact_book.phphook to utilize AppGini'ssendmail()for improved reliability. My current focus is now on rigorously examiningreply_slip.phpandreply_form.phpto ensure they also benefit from this upgrade and maintain seamless functionality.Checking Upcoming Email Routines
I'm now investigating
reply_slip.phpandfuture_camp.phpfor any remaining directmail()calls. My goal is to ensure all outgoing notifications leverage the more robustsendmail()function for consistent delivery across the system.Replacing Old Mail Functions
I'm actively refactoring
reply_slip.php, transitioning its directmail()calls to thesendmail()function. This ensures consistent, reliable email delivery, aligning it with the recent upgrade applied tocontact_book.php.Migrating to Sendmail
I've successfully updated
future_camp.phpto usesendmail(). The previous directmail()function has been replaced with the new system, and error logging has been adjusted accordingly. This completes the migration for this module.Validating Mail Function Usage
I'm verifying that both
reply_slip.phpandfuture_camp.phpare indeed utilizing the oldermail()function and require the same update. Once confirmed, I will provide the complete, refactored code for both, ensuring all directmail()calls are replaced withsendmail()and subject lines are properly encoded.
That is great news! I'm glad the contact_book hook is working perfectly with the new SMTP settings.
Yes, both of those extra hook files (reply_slip.php and future_camp.php) also contain the old PHP mail() function and need to be updated to use AppGini's sendmail() function.
(Side note based on your migration project: Since you are actively updating your hook files, please remember to back up your /hooks and /images/ folders on QNAP 1 so you don't lose these customizations during your migration to QNAP 2!)
Here is the fully updated code for both files. You can completely replace the contents of your existing files with the code below.
#1. Updated hooks/reply_slip.php
I replaced the mail() function inside reply_slip_after_insert.
<?php
// File: hooks/reply_slip.php
// Version: 1.9.12
if (session_status() == PHP_SESSION_NONE) {
    session_start();
}

// Set timezone for logging
date_default_timezone_set('Asia/Hong_Kong');

function reply_slip_init(&$options, $memberInfo, &$args) {
    return TRUE;
}

function reply_slip_header($contentType, $memberInfo, &$args) {
    $header = '';

    switch ($contentType) {
        case 'tableview':
            $header = '';
            break;
        case 'detailview':
            $header = '';
            break;
        case 'tableview+detailview':
            $header = '';
            break;
        case 'print-tableview':
            $header = '';
            break;
        case 'print-detailview':
            $header = '';
            break;
        case 'filters':
            $header = '';
            break;
    }

    return $header;
}

function reply_slip_footer($contentType, $memberInfo, &$args) {
    $footer = '';

    switch ($contentType) {
        case 'tableview':
            $footer = '';
            break;
        case 'detailview':
            $footer = '';
            break;
        case 'tableview+detailview':
            $footer = '';
            break;
        case 'print-tableview':
            $footer = '';
            break;
        case 'print-detailview':
            $footer = '';
            break;
        case 'filters':
            $footer = '';
            break;
    }

    return $footer;
}

function reply_slip_before_insert(&$data, $memberInfo, &$args) {
    return TRUE;
}

function reply_slip_after_insert($data, $memberInfo, &$args) {
    $debug_log_file = '/share/Public/php_errors.log';
    $timestamp = date('Y-m-d H:i:s');
    error_log("[$timestamp] reply_slip_after_insert: Reply Slip ID = {$data['id']}, request field = " . ($data['request'] ?? 'not set') . ", mood field = " . ($data['mood'] ?? 'not set'), 3, $debug_log_file);

    // reply_slip.request stores contact_book.id directly
    $contact_book_id = $data['request'] ?? '';
    if (!$contact_book_id || !is_numeric($contact_book_id)) {
        error_log("[$timestamp] Invalid or missing contact_book ID in reply_slip.request for reply_slip ID {$data['id']}", 3, $debug_log_file);
        return TRUE; // Skip email if no valid CB ID
    }

    // Validate the contact_book_id
    if (!sqlValue("SELECT id FROM contact_book WHERE id = '" . makeSafe($contact_book_id) . "'")) {
        error_log("[$timestamp] Contact_book ID $contact_book_id does not exist for reply_slip ID {$data['id']}", 3, $debug_log_file);
        return TRUE;
    }

    // Update reply_slip with original_id and last_id
    $update_query = "UPDATE reply_slip
                     SET original_id = '" . makeSafe($contact_book_id) . "',
                         last_id = '" . makeSafe($contact_book_id) . "'
                     WHERE id = '" . makeSafe($data['id']) . "'";
    sql($update_query, $eo);
    if ($eo && !empty($eo['error'])) {
        error_log("[$timestamp] Failed to update original_id and last_id for reply_slip ID {$data['id']}: " . $eo['error'], 3, $debug_log_file);
    }

    // Fetch task preview
    $task_preview = sqlValue("SELECT request FROM contact_book WHERE id = '" . makeSafe($contact_book_id) . "'") ?: 'No task preview available.';
    $task_preview = strip_tags(htmlspecialchars_decode($task_preview, ENT_QUOTES));
    $task_preview = mb_substr($task_preview, 0, 40, 'UTF-8') . (mb_strlen($task_preview, 'UTF-8') > 40 ? '...' : '');

    // Fetch mood name from set_mood
    $mood_id = $data['mood'] ?? '';
    $mood_name = 'Not specified';
    if (!empty($mood_id)) {
        $query = "SELECT name FROM set_mood WHERE id = '" . makeSafe($mood_id) . "'";
        $mood_name = sqlValue($query);
        error_log("[$timestamp] Mood name query result for mood ID $mood_id: " . var_export($mood_name, true), 3, $debug_log_file);
        if ($mood_name === NULL || $mood_name === false || trim($mood_name) === '') {
            error_log("[$timestamp] Failed to fetch valid mood name for mood ID $mood_id from set_mood", 3, $debug_log_file);
            $mood_name = "Unknown mood (ID: " . htmlspecialchars($mood_id) . ")";
        }
    }
    error_log("[$timestamp] Final mood name before email for reply slip ID {$data['id']}: " . var_export($mood_name, true), 3, $debug_log_file);

    // Escape mood name for HTML
    $mood_name_escaped = htmlspecialchars($mood_name, ENT_QUOTES, 'UTF-8');

    // Fetch submitter details
    $submitter_id = sqlValue("SELECT personnel_filtered FROM contact_book WHERE id = '" . makeSafe($contact_book_id) . "'") ?: '';
    $submitter_login_id = $submitter_id ? sqlValue("SELECT login_id FROM personnel WHERE id = '" . makeSafe($submitter_id) . "'") : '';
    $submitter_name = $submitter_login_id ? sqlValue("SELECT custom1 FROM membership_users WHERE memberID = '" . makeSafe($submitter_login_id) . "'") ?: $submitter_login_id : $submitter_login_id;

    // Fetch creator details
    $creator_member_id = sqlValue("SELECT requested_by FROM contact_book WHERE id = '" . makeSafe($contact_book_id) . "'") ?: '';
    $creator_data = $creator_member_id ? db_fetch_assoc(sql("SELECT u.email, u.custom1, g.name AS group_name
                                                           FROM membership_users u
                                                           LEFT JOIN membership_groups g ON u.groupID = g.groupID
                                                           WHERE u.memberID = '" . makeSafe($creator_member_id) . "'", $eo)) : [];
    $creator_email = $creator_data['email'] ?? '';
    $creator_name = $creator_data['custom1'] ?? $creator_member_id;
    $user_group = $creator_data['group_name'] ?? '';

    // Fetch random quote
    $themes = ($user_group === 'Manager') ? "'Management', 'Work', 'Scripture'" : ($user_group === 'Staff' ? "'Work', 'Scripture'" : "'Work'");
    $full_quote = sqlValue("SELECT CONCAT(message, '<br>—— ', author) FROM tip_and_quote WHERE type IN ($themes) ORDER BY RAND() LIMIT 1") ?: 'No quote available.';

    // Send email to creator
    if ($creator_email && $contact_book_id) {
        $to = $creator_email;
        $subject = "[Chaplaincy Admin] $creator_name, 你有一個新的回條!";
        $message = sprintf(
            "<html><body style=\"font-family: Arial, sans-serif;\"><p>%s 你好,</p><p></p><p>%s 剛回覆了你指派的工作:</p><p></p><p>%s</p><p></p><p>她表示 %s</p><p></p><p>以下送你一個隨機小Tips,助你在團隊溝通中更有智慧:</p><p></p><p>%s</p><p></p><p>聯絡簿 ID: <a href=\"https://admin.nlt-chaplaincy.org/contact_book_view.php?SelectedID=%s\">%s</a><br><i>(按 ID 瀏覽任務詳情。如系統顯示 Sorry! You don't have permission...,請登入即可。)</i></p></body></html>",
            htmlspecialchars($creator_name, ENT_QUOTES, 'UTF-8'),
            htmlspecialchars($submitter_name, ENT_QUOTES, 'UTF-8'),
            htmlspecialchars($task_preview, ENT_QUOTES, 'UTF-8'),
            $mood_name_escaped,
            $full_quote, // Removed htmlspecialchars to allow <br> to render as HTML
            $contact_book_id,
            $contact_book_id
        );
        error_log("[$timestamp] Email body for reply slip ID {$data['id']}: " . $message, 3, $debug_log_file);

        // UPDATED: Using AppGini's sendmail()
        $mail_reply = [
            'to' => $to,
            'subject' => $subject,
            'message' => $message
        ];
        $send_result = sendmail($mail_reply);
        if ($send_result !== true) {
            error_log("[$timestamp] Failed to send reply notification email to $to for contact_book ID $contact_book_id. Error: $send_result", 3, $debug_log_file);
        }
    }

    return TRUE;
}

function reply_slip_before_update(&$data, $memberInfo, &$args) {
    return TRUE;
}

function reply_slip_after_update($data, $memberInfo, &$args) {
    return TRUE;
}

function reply_slip_before_delete($selectedID, &$skipChecks, $memberInfo, &$args) {
    return TRUE;
}

function reply_slip_after_delete($selectedID, $memberInfo, &$args) {}

function reply_slip_dv($selectedID, $memberInfo, &$html, &$args) {}

function reply_slip_csv($query, $memberInfo, &$args) {
    return $query;
}

function reply_slip_batch_actions(&$args) {
    return [];
}#2. Updated hooks/future_camp.php
I replaced the mail() function inside future_camp_after_update.
<?php
// File: hooks/future_camp.php
// Version: 1.6.3
if (session_status() == PHP_SESSION_NONE) {
    session_start();
}

// For help on using hooks, please refer to https://bigprof.com/appgini/help/advanced-topics/hooks/

// Set timezone for logging
date_default_timezone_set('Asia/Hong_Kong');

function future_camp_init(&$options, $memberInfo, &$args) {
    return TRUE;
}

function future_camp_header($contentType, $memberInfo, &$args) {
    $header = '';

    switch ($contentType) {
        case 'tableview':
            $header = '';
            break;
        case 'detailview':
            $header = '';
            break;
        case 'tableview+detailview':
            $header = '';
            break;
        case 'print-tableview':
            $header = '';
            break;
        case 'print-detailview':
            $header = '';
            break;
        case 'filters':
            $header = '';
            break;
    }

    return $header;
}

function future_camp_footer($contentType, $memberInfo, &$args) {
    $footer = '';

    switch ($contentType) {
        case 'tableview':
            $footer = '';
            break;
        case 'detailview':
            $footer = '';
            break;
        case 'tableview+detailview':
            $footer = '';
            break;
        case 'print-tableview':
            $footer = '';
            break;
        case 'print-detailview':
            $footer = '';
            break;
        case 'filters':
            $footer = '';
            break;
    }

    return $footer;
}

function future_camp_before_insert(&$data, $memberInfo, &$args) {
    return TRUE;
}

function future_camp_after_insert($data, $memberInfo, &$args) {
    $debug_log_file = '/share/Public/php_errors.log';
    $timestamp = date('Y-m-d H:i:s');
    error_log("[$timestamp] future_camp_after_insert: ID = {$data['id']}", 3, $debug_log_file);
    return TRUE;
}

function future_camp_before_update(&$data, $memberInfo, &$args) {
    // Capture the 't' parameter for redirect
    $t = '';
    if (isset($_SERVER['REQUEST_URI'])) {
        $urlParts = parse_url($_SERVER['REQUEST_URI']);
        if (isset($urlParts['query'])) {
            parse_str($urlParts['query'], $queryParams);
            if (isset($queryParams['t'])) {
                $t = $queryParams['t'];
            }
        }
    }
    $_SESSION['future_camp_redirect_t'] = $t;

    return TRUE;
}

function future_camp_after_update($data, $memberInfo, &$args) {
    $debug_log_file = '/share/Public/php_errors.log';
    $timestamp = date('Y-m-d H:i:s');

    // Helper function to archive the record in task_archive
    $archiveRecord = function ($data) use ($debug_log_file, $timestamp) {
        // Map fields from future_camp to task_archive
        $original_creator = $data['requested_by'] ?? '';
        $original_date = $data['date_requested'] ?? '';
        $original_request = $data['idea_and_need'] ?? '';
        $original_illustration = $data['illustration'] ?? '';
        $original_id = $data['original_id'] ?? '';

        // Insert into task_archive (omit 'id' for auto-increment)
        $archive_query = "INSERT INTO task_archive (
            original_creator, original_date, original_request, original_illustration, original_id
        ) VALUES (
            '" . makeSafe($original_creator) . "',
            '" . makeSafe($original_date) . "',
            '" . makeSafe($original_request) . "',
            '" . makeSafe($original_illustration) . "',
            '" . makeSafe($original_id) . "'
        )";
        sql($archive_query, $eo);

        if ($eo && !empty($eo['error'])) {
            error_log("[$timestamp] Failed to archive future_camp ID {$data['id']}: " . $eo['error'], 3, $debug_log_file);
            return FALSE;
        }

        error_log("[$timestamp] Successfully archived future_camp ID {$data['id']} to task_archive", 3, $debug_log_file);
        return TRUE;
    };

    // Check if the status field exists and has been updated to "立即執行"
    if (isset($data['status']) && $data['status'] === '立即執行') {
        error_log("[$timestamp] Moving future_camp ID {$data['id']} back to contact_book", 3, $debug_log_file);

        // Insert the record into contact_book, preserving the previous last_id from future_camp
        $project = !empty($data['project']) ? "'" . makeSafe($data['project']) . "'" : 'NULL';
        $previous_last_id = $data['last_id'] ?? NULL;
        $last_id_value = $previous_last_id ? "'" . makeSafe($previous_last_id) . "'" : 'NULL';
        $insert_query = "INSERT INTO contact_book (
            requested_by, date_requested, project, request, illustration, attachment,
            status, last_id
        ) VALUES (
            '" . makeSafe($data['requested_by']) . "',
            '" . makeSafe($data['date_requested']) . "',
            $project,
            '" . makeSafe($data['idea_and_need']) . "',
            '" . makeSafe($data['illustration']) . "',
            '" . makeSafe($data['attachment']) . "',
            '活躍中',
            $last_id_value
        )";
        sql($insert_query, $eo);

        if ($eo && !empty($eo['error'])) {
            error_log("[$timestamp] Failed to insert record into contact_book from future_camp ID {$data['id']}: " . $eo['error'], 3, $debug_log_file);
            return TRUE;
        }

        // Get the newly inserted contact_book ID
        $contact_book_id = sqlValue("SELECT LAST_INSERT_ID()");
        error_log("[$timestamp] New contact_book ID: $contact_book_id", 3, $debug_log_file);

        // Update related Reply Slips to reset chk_deferred to 0 and set last_id to the new CB ID
        $original_id = $data['original_id'] ?? '';
        if (!empty($original_id)) {
            $update_reply_slips = "UPDATE reply_slip
                                   SET last_id = '" . makeSafe($contact_book_id) . "',
                                       chk_deferred = 0,
                                       chk_completed = 0
                                   WHERE last_id = '" . makeSafe($original_id) . "'";
            sql($update_reply_slips, $eo);

            if ($eo && !empty($eo['error'])) {
                error_log("[$timestamp] Failed to update reply_slip for future_camp ID {$data['id']}: " . $eo['error'], 3, $debug_log_file);
            } else {
                error_log("[$timestamp] Successfully updated reply_slip for future_camp ID {$data['id']}: set last_id to $contact_book_id, reset chk_deferred and chk_completed to 0", 3, $debug_log_file);
            }
        }

        // Send notification email to creator
        $creator_member_id = $data['requested_by'] ?? '';
        $creator_data = $creator_member_id ? db_fetch_assoc(sql("SELECT u.email, u.custom1, g.name AS group_name
                                                               FROM membership_users u
                                                               LEFT JOIN membership_groups g ON u.groupID = g.groupID
                                                               WHERE u.memberID = '" . makeSafe($creator_member_id) . "'", $eo)) : [];
        $creator_email = $creator_data['email'] ?? '';
        $creator_name = $creator_data['custom1'] ?? $creator_member_id;
        $user_group = $creator_data['group_name'] ?? '';

        if ($creator_email) {
            $task_description = strip_tags(htmlspecialchars_decode($data['idea_and_need'] ?? 'No description', ENT_QUOTES));
            $task_description = mb_substr($task_description, 0, 40, 'UTF-8') . (mb_strlen($task_description, 'UTF-8') > 40 ? '...' : '');
            $themes = ($user_group === 'Manager') ? "'Management', 'Work', 'Scripture'" : ($user_group === 'Staff' ? "'Work', 'Scripture'" : "'Work'");
            $full_quote = sqlValue("SELECT CONCAT(message, '<br>—— ', author) FROM tip_and_quote WHERE type IN ($themes) ORDER BY RAND() LIMIT 1") ?: 'No quote available.';

            $subject = "[Chaplaincy Admin] $creator_name, 你的任務已重新激活!";
            $message = "<html><body style=\"font-family: Arial, sans-serif;\"><p>$creator_name 你好,</p><p></p><p>你的任務已從未來計劃中重新激活!</p><p></p><p>任務詳情:<br>$task_description</p><p></p><p>以下是一個隨機小Tips,助你提升工作效率:</p><p></p><p>$full_quote</p><p></p><p>請繼續努力,謝謝!</p><p></p><p>聯絡簿 ID: <a href=\"https://admin.nlt-chaplaincy.org/contact_book_view.php?SelectedID=$contact_book_id\">$contact_book_id</a><br><i>(按 ID 瀏覽任務詳情。如系統顯示 Sorry! You don't have permission...,請登入即可。)</i></p></body></html>";

            // UPDATED: Using AppGini's sendmail()
            $mail_reactivate = [
                'to' => $creator_email,
                'subject' => $subject,
                'message' => $message
            ];
            $send_result = sendmail($mail_reactivate);
            if ($send_result !== true) {
                error_log("[$timestamp] Failed to send reactivation email to $creator_email for contact_book ID $contact_book_id. Error: $send_result", 3, $debug_log_file);
            }
        }

        // Delete the record from future_camp
        $delete_query = "DELETE FROM future_camp WHERE id = '" . makeSafe($data['id']) . "'";
        sql($delete_query, $eo);

        if ($eo && !empty($eo['error'])) {
            error_log("[$timestamp] Failed to delete future_camp ID {$data['id']} after moving to contact_book: " . $eo['error'], 3, $debug_log_file);
            return TRUE;
        }

        error_log("[$timestamp] Successfully moved future_camp ID {$data['id']} to contact_book (new ID: $contact_book_id)", 3, $debug_log_file);

        // Redirect to Future Camp Table View
        $queryParams = [];
        if (isset($_SESSION['future_camp_redirect_t']) && !empty($_SESSION['future_camp_redirect_t'])) {
            $queryParams['t'] = $_SESSION['future_camp_redirect_t'];
        } else {
            $queryParams['t'] = time();
        }
        $redirectUrl = 'future_camp_view.php?' . http_build_query($queryParams);

        unset($_SESSION['future_camp_redirect_t']);
        redirect($redirectUrl);
        exit;
    }

    return TRUE;
}

function future_camp_before_delete($selectedID, &$skipChecks, $memberInfo, &$args) {
    return TRUE;
}

function future_camp_after_delete($selectedID, $memberInfo, &$args) {
    $debug_log_file = '/share/Public/php_errors.log';
    $timestamp = date('Y-m-d H:i:s');
    error_log("[$timestamp] future_camp_after_delete: ID = $selectedID", 3, $debug_log_file);
}

function future_camp_dv($selectedID, $memberInfo, &$html, &$args) {
    $debug_log_file = '/share/Public/php_errors.log';
    $timestamp = date('Y-m-d H:i:s');
    error_log("[$timestamp] future_camp_dv: SelectedID = $selectedID", 3, $debug_log_file);
}

function future_camp_csv($query, $memberInfo, &$args) {
    return $query;
}

function future_camp_batch_actions(&$args) {
    return [];
}#Q49: Now the preparation for erasing QNAP 1 has been done! Can you go back to review our chat and consolidate what we've done in proper order? Just like what we have actually done before erasing, which I will do once all necessary prep. work are done.
#A: Congratulations on reaching this major milestone! Migrating a critical web application like "Chaplaincy Admin" requires a lot of moving parts, and you have done a fantastic job meticulously preparing for this transition.
Before you pull the plug and erase QNAP 1, here is the consolidated checklist of everything we have accomplished and prepared, in logical order, based on our journey together:
#1. The Safety Nets (System & App Backups)
- QNAP 1 System Settings: You explicitly exported the server settings of QNAP 1. If you discover later that a specific NAS configuration was missed, you have this file to reference or restore.
- Crucial Web App Folders: You successfully backed up the
/hooks(containing your custom PHP logic) and/images/(containing user uploads) folders from QNAP 1 to ensure no custom code or media is lost during the move.
#2. Database Migration & Cleanup (MariaDB)
- Strategic Choice: Instead of moving the whole database container, you opted to connect the Chaplaincy Admin app to the existing MariaDB container on QNAP 2 for better resource management.
- Exporting: You exported the database from QNAP 1 using phpMyAdmin, ensuring you selected both "Structure and Data".
- Schema Cleanup & Troubleshooting: You encountered and resolved several SQL import errors. You cleaned up the
.sqlfile by removing unneeded views (like01_song_techniques), fixing syntax errors (like theAS ASCorder ASCissue), and removing problematic view-definer/algorithm statements. - Import & Verification: You successfully imported the refined SQL file into QNAP 2 and validated the schemas to ensure tables and views were correctly recognized.
- Security: You created a new dedicated Database User on QNAP 2 and configured the appropriate global/database-level privileges (checking "Data" privileges) so the web app can securely access its data.
#3. Web Application Files & Permissions
- File Transfer: You copied the core Chaplaincy Admin web application directory from QNAP 1 to QNAP 2.
- Permission Fixes: Because QNAP's UI hides the
httpdusr(HTTP user), you applied a workaround using the "everyone" Local Group to ensure the QNAP 2 web server has Read/Write (RW) access to the/images/folder, allowing file uploads to work correctly.
#4. Code Modernization (AppGini Hooks)
- SMTP Updates: Because of the server move and new email configurations, the old native PHP
mail()function was no longer viable. We systematically updated your custom hook files (contact_book.php,reply_slip.php, andfuture_camp.php) to use AppGini's built-insendmail()function, ensuring your automated notification emails continue to work flawlessly on QNAP 2.
#5. Preparing the "Sacrificial" Role (Nginx Proxy Manager)
- Container Testing: You successfully tested the deployment of Nginx Proxy Manager using Container Station and the
jc21/nginx-proxy-manager:latestimage. - Access Confirmed: You verified access to the NPM Admin panel on port 81 (using
Ctrl+Shift+Rto bypass browser caching issues), proving that QNAP 1 is fully capable of taking on its new life as a reverse proxy.
#🚀 Next Steps: The Erase & Hardware Reconfiguration
Now that the Chaplaincy Admin app is safely living on QNAP 2, you are cleared for the final physical and system teardown of QNAP 1:
- The Wipe: Erase/reinitialize QNAP 1.
- Hardware Adjustment: As you planned, remove two drives from QNAP 1 to downgrade it to a single-drive machine.
- The Rebirth: Set up the fresh, single-drive QNAP 1 strictly as your sacrificial Nginx Proxy Manager machine to handle incoming web traffic and route it securely to QNAP 2.
Take a deep breath—you've done the hard work, and your preparation is rock solid. Let me know when you are ready to proceed with the NPM setup on the freshly wiped QNAP 1!
#Q45: For "Permission Fixes", I've actually SSH into the QNAP 2 to grand proper permissions to httpdusr per your advise for better security.
#A: Ah, excellent correction! That is a much better and more secure approach.
I'm really glad you took the extra step to SSH into QNAP 2 and assign the permissions directly to httpdusr (using chown/chmod). Relying on the "everyone" group via the UI is a quick workaround, but doing it properly via the command line ensures the principle of least privilege—meaning only the web server has the exact access it needs to the /images/ folder, keeping your application much more secure.
Let's update that specific point for the official record:
#3. Web Application Files & Permissions (Updated)
- File Transfer: You copied the core Chaplaincy Admin web application directory from QNAP 1 to QNAP 2.
- Permission Fixes (Secured): Since the QNAP UI hides the
httpdusr(HTTP user), you bypassed the UI limitations by SSHing directly into QNAP 2. You granted the proper Read/Write permissions specifically tohttpdusrfor the/images/folder, ensuring file uploads work perfectly while maintaining strict security standards.
You truly haven't cut any corners on this migration. With the app fully secured and functioning on QNAP 2, you are absolutely ready to wipe QNAP 1, pull those two extra drives, and give it its new life as your dedicated Nginx Proxy Manager!
Good luck with the wipe, and let me know how the NPM setup goes once the hardware is ready!
CMS quick check.
#Q50: Just last bit of checking. Since the Ch. Admin website has a custom CMS that pull contents from a DB table and display them in order. There is a JS that shows a pop-up modal and load PayPal donation buttons. When running from the local IP of QNAP 2, the modal, YouTube embedding, and PP buttons all fail. Do you think this is normal until the website can be accessed with a proper domain name like before?
#A: Yes, this is completely normal and highly expected when testing a modern web application via a local IP address instead of its proper domain name.
You don't need to panic! Here is exactly why those specific elements (PayPal, YouTube, and JS modals) are failing right now, and why they will magically fix themselves once your domain and Nginx Proxy Manager (NPM) are set up:
#1. The HTTPS / Secure Context Requirement (PayPal)
PayPal's JavaScript SDK and donation buttons have strict security requirements. They generally refuse to render or function properly if the site is not loaded over a secure HTTPS connection. Since you are accessing QNAP 2 via a local IP address (which is almost certainly using standard HTTP), your browser and PayPal are blocking the scripts to protect payment data. Once NPM provides the SSL certificate (HTTPS) for your domain, PayPal will be happy again.
#2. Cross-Origin Resource Sharing (CORS) & Hardcoded URLs
If your custom CMS or the JavaScript that triggers the modal has your actual domain name hardcoded anywhere in its settings or database (e.g., https://yourdomain.com/api/get_modal_content), accessing the site via http://192.168.x.x creates a mismatch. The browser sees the local IP trying to request data from the official domain name and blocks it due to CORS security policies.
#3. Mixed Content & Iframe Blocks (YouTube)
If your local IP connection is HTTP, but the YouTube embed code is trying to load via HTTPS (or uses a protocol-relative URL like //www.youtube.com/...), modern browsers often block this as "Mixed Content" or due to strict iframe security policies on local networks.
#How to quickly verify this:
If you want to be 100% sure, open your website on the local IP, press F12 to open your browser's Developer Tools, and click on the Console tab. You will likely see a bunch of red errors saying things like:
- Blocked loading mixed active content
- CORS policy violation
- Refused to display in a frame because it set 'X-Frame-Options'
The Verdict: You are good to go. These are classic "local testing" symptoms. Once you wipe QNAP 1, set up Nginx Proxy Manager, point your domain name to it, and generate your Let's Encrypt SSL certificate, the browser will see the secure, official domain name, and all your modals, videos, and donation buttons will spring back to life!
Back to server setup.
#Q51: Do I need to enable web server for QNAP 1 or the NPM image will have one built in?
#A: You do not need to enable the QNAP web server. In fact, you definitely shouldn't!
Here is why: The Nginx Proxy Manager (NPM) Docker image has its own highly optimized Nginx web server built right into it.
When you deploy NPM, it brings everything it needs to handle web traffic, manage SSL certificates, and route requests.
However, this brings up a very important technical detail you need to handle on the freshly wiped QNAP 1 to prevent a clash:
#The Port 80 and 443 Conflict
For NPM to do its job as your "front door," your router will forward external web traffic (Port 80 for HTTP, and Port 443 for HTTPS) to QNAP 1. Therefore, the NPM container needs to listen on Port 80 and Port 443.
If you enable QNAP's built-in Web Server, it will steal those ports. Even if you don't enable the Web Server, QNAP's Admin interface often uses Port 443 by default for secure login. If QNAP is holding onto Port 443, your NPM container will fail to deploy because the port is "already in use."
#What you need to do on the fresh QNAP 1:
- Keep the Web Server Disabled: Go to Control Panel > Applications > Web Server, and make sure "Enable Web Server" is unchecked.
- Change the QNAP System Port: Go to Control Panel > System > General Settings > System Administration.
- If the "System port" is 8080, leave it.
- If the "Enable secure connection (HTTPS)" is checked and set to 443, change it to something else, like 4433 or 8443.
By moving the QNAP admin interface off port 443, you leave ports 80 and 443 completely free. When you deploy your NPM container, you can map its ports directly (80:80 and 443:443), and it will perfectly catch all the traffic coming from your router!
#Q52: I've installed NPM in Container Station and given it a static IP for 192.168.3.40, with QNAP 1 on reserved IP 192.168.3.251.
- I've created two firewall rules to forward port 80 and 443 to NPM (192.168.3.40) and placed them at the very bottom.
- Two Port Forwarding rules have been created to forward port 80 and 443 to NPM (192.168.3.40).
What should I do next to
- Forward https://admin.nlt-chaplaincy.org to my QNAP 2's web app directory, and
- Forward https://www.nlt-chaplaincy.org to the /public folder under the web app directory (I was using the Virtual Host feature of QTS)?
#A: This is a brilliant setup! Giving the NPM container its own dedicated IP address (192.168.3.40) using a bridge/macvlan network is the cleanest possible way to do this. It completely bypasses any port conflicts with QNAP 1's operating system.
To get your two domains pointing to the correct folders, we need to use a combination of NPM (acting as the secure front door) and QNAP 2 (acting as the backend web server).
Because NPM simply forwards traffic to an IP address and a port, QNAP 2 still needs to know which folder to serve when that traffic arrives. Therefore, you will still use the QTS Virtual Host feature on QNAP 2 to handle the folder routing.
Here is the exact step-by-step process:
#Step 1: Set up Virtual Hosts on QNAP 2
NPM will pass the domain name (Host Header) through to QNAP 2. We need QNAP 2's web server to listen for those names and serve the correct folders.
- Log into QNAP 2.
- Go to Control Panel > Applications > Web Server > Virtual Host.
- Enable Virtual Host if it isn't already.
- Create Virtual Host 1 (Admin):
- Hostname:
admin.nlt-chaplaincy.org - Port:
80(Keep this as HTTP/80. NPM will handle the HTTPS/443 part externally). - Root Directory: Select your main web app directory.
- Hostname:
- Create Virtual Host 2 (Public):
- Hostname:
www.nlt-chaplaincy.org - Port:
80 - Root Directory: Select the
/publicfolder inside your web app directory.
- Hostname:
#Step 2: Configure Nginx Proxy Manager (NPM)
Now we tell NPM to catch the external HTTPS traffic, get the SSL certificates, and forward the requests to QNAP 2.
- Log into your NPM admin panel (
http://192.168.3.40:81). - Go to Hosts > Proxy Hosts and click Add Proxy Host.
For the Admin Site:
- Details Tab:
- Domain Names:
admin.nlt-chaplaincy.org - Scheme:
http(Because we are forwarding to QNAP 2's port 80). - Forward Hostname / IP: Enter QNAP 2's local IP address (e.g.,
192.168.3.x). - Forward Port:
80 - Check Cache Assets, Block Common Exploits, and Websockets Support.
- Domain Names:
- SSL Tab:
- SSL Certificate: Select Request a new SSL Certificate.
- Check Force SSL (This ensures anyone typing
http://is forced to securehttps://). - Enter your email address and agree to the Let's Encrypt Terms of Service.
- Click Save. (NPM will reach out to Let's Encrypt, verify your port forwarding is correct, and generate the certificate).
For the Public Site:
- Click Add Proxy Host again.
- Details Tab:
- Domain Names:
www.nlt-chaplaincy.org - Scheme:
http - Forward Hostname / IP: Enter QNAP 2's local IP address.
- Forward Port:
80 - Check the three options (Cache, Exploits, Websockets).
- Domain Names:
- SSL Tab:
- SSL Certificate: Select Request a new SSL Certificate.
- Check Force SSL.
- Agree to the terms.
- Click Save.
#Step 3: DNS Check
Ensure that your domain registrar (where you bought nlt-chaplaincy.org) has the DNS A Records for both admin and www pointing to your router's public IP address.
#How this flow works in practice:
- A user visits
https://www.nlt-chaplaincy.org. - Your router catches port 443 and sends it to NPM (
192.168.3.40). - NPM decrypts the HTTPS traffic using the Let's Encrypt certificate.
- NPM forwards the request as standard HTTP to QNAP 2's IP on port 80, keeping the hostname
www.nlt-chaplaincy.orgintact. - QNAP 2's Web Server sees the request for
www.nlt-chaplaincy.org, checks its Virtual Host list, and serves the/publicfolder!
Try setting up those Proxy Hosts in NPM and let me know if it successfully generates the SSL certificates!
#Q53: This is the screen I have. No field for email. Testing the domains gives the Test Results on the screen.
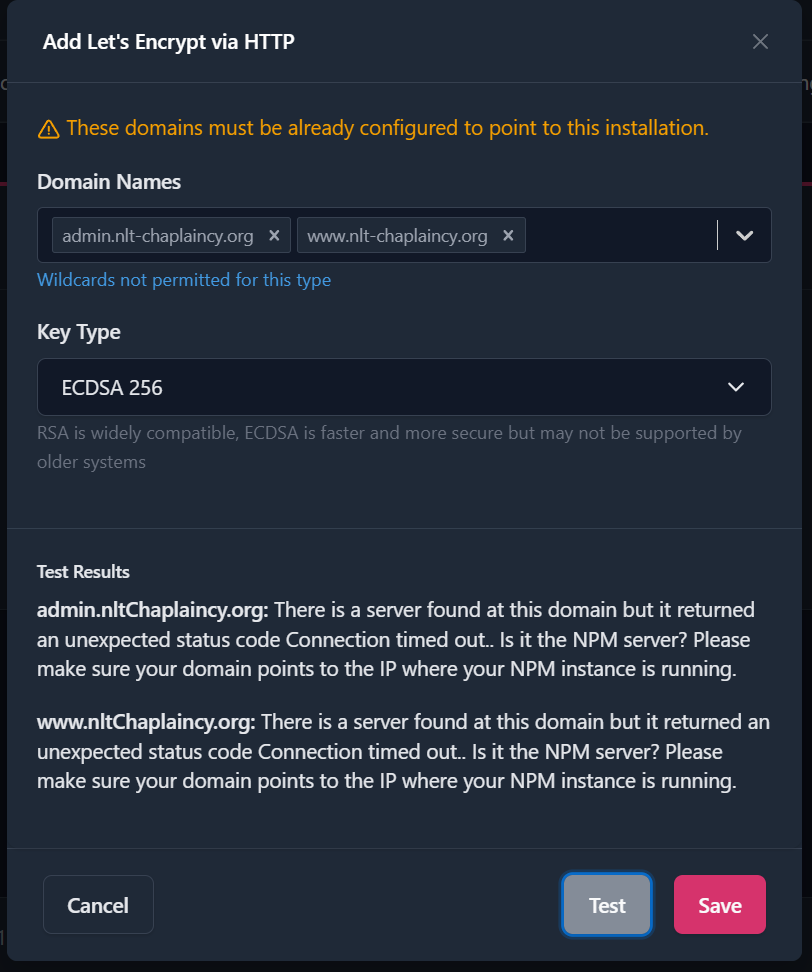
#A: Thank you for the screenshot! This perfectly explains what is going on.
You are using a newer version of Nginx Proxy Manager. In this version, they introduced a "Test Server Reachability" feature. The UI now hides the Email and Terms of Service fields until it successfully verifies that your domains are reachable, or it pulls the email directly from your Admin user profile.
The missing email field isn't the problem—the "Connection timed out" error is the real roadblock. This error means NPM reached out to the internet, tried to visit http://admin.nlt-chaplaincy.org, and hit a brick wall. Because NPM can't reach itself from the outside, it knows Let's Encrypt won't be able to reach it either, so it stops the process.
Here is exactly how we isolate and fix this timeout:
#Step 1: The "Outside World" Test (Crucial)
We need to know if the block is happening at your router/ISP, or if it's just an internal network quirk (NAT Loopback).
- Make sure you are connected to your home network.
- Go to canyouseeme.org in your browser.
- It will automatically detect your public IP address.
- In the Port to Check box, type
80and click Check Port. - Do the same for Port
443.
If it says "Error: I could not see your service": This confirms external traffic is being blocked before it reaches NPM.
- The Fix: Go back into your router settings. You mentioned earlier that you put the Firewall rules "at the very bottom." You must move these rules to the very top. Routers read rules from top to bottom; if there is a default "block all" rule above your new rules, your port forwarding gets ignored.
- Also, double-check that your Port Forwarding rules are pointing exactly to NPM's IP:
192.168.3.40.
If it says "Success": This means your ports are perfectly open, but your router doesn't support "NAT Loopback" (which allows devices inside your network to access other internal devices using the public IP).
- The Fix: If
canyouseeme.orgsays Success, you can safely ignore NPM's test! Just click the Save button anyway to force it to request the certificate. Let's Encrypt (which is outside your network) will be able to reach it just fine.
#Step 2: Verify Your Public IP matches your DNS
Since you are hosting from home, your public IP address might have changed recently (ISPs do this dynamically).
- Look at the IP address shown on
canyouseeme.org. - Log into your domain registrar (where you bought
nlt-chaplaincy.org). - Check your DNS A Records for
adminandwww. - Ensure the IP address in those records perfectly matches the IP address you saw on canyouseeme.org. If they don't match, update your DNS records and wait about 15-30 minutes for the changes to spread across the internet.
Summary of your next move:
Check canyouseeme.org on Port 80. If it fails, move your router firewall rules to the top. If your IP changed, update your DNS. Once Port 80 is open to the outside world, that NPM test will pass instantly!
#Q54: canyouseeme.org can't see me on both 80/443 ports.
I've checked the domain DNS settings at GoDaddy. Both www and admin are pointing to "claudioflute.synology.me." I can reach the default NPM page (Congratulations! You've successfully started the Nginx Proxy Manager.) with it.
I go to the router and enable the Generate FW Rules Automatically option for testing. It creates two gray-out rules at the VERY BOTTOM.
I test again in the NPM cert. page to do the test again. The two FW rules get hits, meaning they are working. But this time it gives another error:
Unexpected token '<', "<html> <h"... is not valid JSON.
#A: It looks like your message got cut off at the "2.", but I have excellent news for you based on what you shared!
If you can type your domain into a browser and see the "Congratulations! You've successfully started the Nginx Proxy Manager" page, your port forwarding is 100% working.
You can completely ignore the canyouseeme.org failure. Sometimes routers or ISPs block automated ping tools, but the fact that real web traffic is hitting your NPM container means your firewall and port forwarding rules are doing exactly what they are supposed to do. Using claudioflute.synology.me as your DDNS target in GoDaddy is also a perfectly smart way to handle this!
#So, what is that Unexpected token ... not valid JSON error?
This is a very well-known bug in the Nginx Proxy Manager interface.
When you click the "Test" button, NPM tries to reach out to the internet and visit your domain to see if it routes back to itself. However, because the request is originating from inside your network, your router gets confused (an issue called NAT Loopback). Instead of sending the traffic to NPM, your router intercepts it and serves an internal HTML page (like your router's login page or a blank firewall page).
NPM is expecting a background data file (JSON) to confirm the test, but it receives an HTML webpage instead (which starts with <html> <h...). When it tries to read the HTML as JSON, it crashes and throws that exact error.
#How to bypass this and get your certificate:
1. Do not click the "Test" button. Because we already know the outside world can reach your NPM container (you saw the Congratulations page!), we don't need NPM's internal test. Just fill out the domain names, select "Request a new SSL Certificate", agree to the terms, and click Save directly. Let's Encrypt will test it from the outside, which bypasses your router's internal loopback confusion.
2. Clear the NPM interface cache. If NPM still throws the JSON error when you click "Save", it means the Admin UI has glitched out and cached the error.
- Since you already know the shortcut, press Ctrl-Shift-R to hard-refresh the NPM Admin panel (or open it in an Incognito/Private window).
- Try adding the SSL certificate again and hit Save.
You are literally at the finish line. Since the traffic is successfully reaching NPM, Let's Encrypt will be able to issue that certificate the moment we bypass that buggy Test button!
(Also, let me know what your "2." was going to be if you had another question!)
Firewall settings.
(Nov 2, 2026)
#Q55: Both domains are now working by following your previous outlined steps. All errors are gone! Next, I will need to review the firewall rules. Now, from bottom to top are:
- A single rule that blocks Synology from accessing the internet using it's old IP as a reverse proxy
- Four rules that Deny the VLANs from talking to each other (Network Isolation option NOT checked for all VLANs)
- Rules that set which device can talk to which
Please review the screenshot and advised updates/removal of these rules.
The latest setup is:
- QNAP 1 (TS-216) at 192.168.3.251 (DMZ network)
- QNAP 2 (TS-262C) at 192.168.1.249 (Primary network)
- Synology (DS-418Play) at 192.168.1.131 (Primary network)
- PC, Mac and phones at 192.168.4.X (Admin network)
You can look at the screenshot for details.
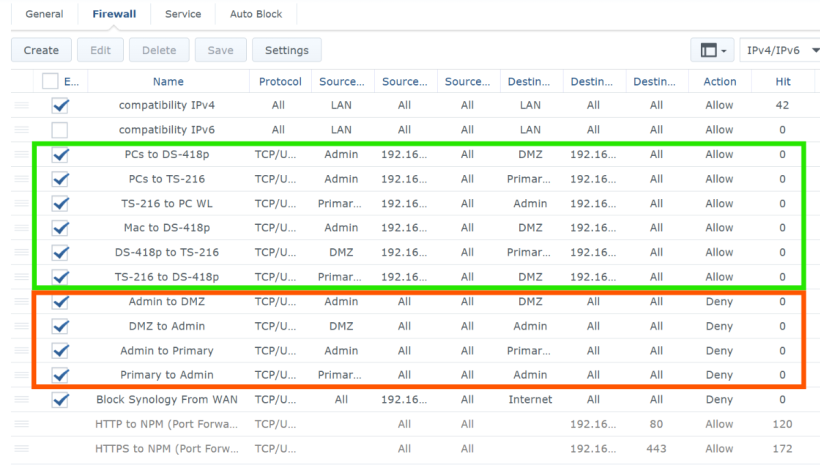
#A: That is fantastic news! Getting NPM and the SSL certificates working is often the hardest part of a reverse proxy setup. Great job!
Looking at your firewall screenshot, your overall logic is excellent. You are correctly using the "Allow Exceptions (Green) -> General Denies (Orange)" structure. Firewalls read rules from top to bottom, so placing your specific allows above your broad blocks is exactly how it should be done.
However, keeping in mind that your QNAP 1 (TS-216) is meant to be a sacrificial, internet-facing machine, there is a critical security gap in your current rules, along with a few tweaks to make.
Here are my recommended updates for your firewall rules:
#1. The Critical Missing Block (DMZ to Primary)
Right now, your Orange box blocks Admin ↔ DMZ and Admin ↔ Primary. However, it does not block DMZ ↔ Primary.
Because Network Isolation is unchecked, your sacrificial QNAP 1 (DMZ) currently has wide-open access to your secure QNAP 2 and Synology (Primary). If NPM is compromised, an attacker could move directly into your Primary network.
- Action: Add two new Deny rules to the Orange box:
DMZ → Primary(Deny)Primary → DMZ(Deny)
#2. Update the Green "Allow" Rules
Because we are going to block DMZ and Primary from communicating freely, we need to explicitly allow NPM to do its job while removing unnecessary access.
- Remove
TS-216 → PC WL: Your sacrificial DMZ machine should never be allowed to initiate connections to your secure Admin PCs. - Remove
TS-216 → DS-418p: Unless NPM needs to proxy a service hosted on the Synology, the DMZ should not have access to it. - Add a rule for Chaplaincy Admin* Since NPM (QNAP 1) needs to route web traffic to QNAP 2, add a new Green rule:
Source:
QNAP 1 (192.168.3.251)Destination:*QNAP 2 (192.168.1.249)Best practice:Restrict this rule to onlythe TCP ports required by your webapplications (or example, 80, 443 or specific Docker ports)rather than allowing all ports
#3. Port Forwarding Rules
The HTTP to NPM and HTTPS to NPM port-forwarding rules are currently at the bottom of the list. They work because no rules above them currently block inbound WAN traffic.
- Action: Move these port-forwarding rules to the very top of the rule set (or immediately below the IPv4/IPv6 compatibility rules).
This ensures incoming Internet traffic is forwarded to NPM immediately without being evaluated against all internal VLAN rules first.
#Summary of the Recommended Rule Order
- IPv4 / IPv6 Compatibility
- HTTP → NPM and HTTPS → NPM (Port Forwarding)
- Greenox (Allow Rules)**
- Admin PCs → QNAP 1
- Admin PCs → QNAP 2
- Admin PCs → Synology
- QNAP 1 → QNAP 2 (web application ports only)
- Orange Box (Dy Rules)**
- Admin ↔ DMZ
- Admin ↔ Primary
- DMZ ↔ Primary
- Block Synology from WAN
#Result
Once these changes are implemented, your sacrificial QNAP 1 will be properly isolated and limited to forwarding web traffic to QNAP 2. The rest of your network will remain protected even if NPM is compromised.
Creative use of the sacrificial server.
#Q56: Will do! Since QNAP 1 is so free now with a 500GB SSD, do you think it can run additional containers that are good for securing the network? Or can I use the disc space for non-critical read-only backup like DVD movies?
#A: It is very tempting to use that extra 500GB SSD space! Since you originally planned for QNAP 1 to be a strictly "sacrificial machine running ONLY NPM," we just have to make sure any additions don't compromise that sacrificial role.
Here is how you can safely utilize both the processing power and the storage space on QNAP 1:
#1. Security Containers (Highly Recommended)
Since QNAP 1 is your frontline bouncer facing the internet, it is the perfect place to run edge security tools.
- CrowdSec: This is the absolute best companion for Nginx Proxy Manager. CrowdSec acts as a collaborative firewall. It reads your NPM access logs in real-time, spots malicious behavior (like bots trying to brute-force your Chaplaincy Admin login or scanning for vulnerabilities), and instantly blocks their IP address. Because it's crowd-sourced, if an IP attacks someone else's server, CrowdSec will proactively block it on your QNAP 1 before they even try.
- Authelia or Authentik: If you ever host web apps that don't have built-in login screens (or you want to add Two-Factor Authentication to them), you can run one of these identity providers on QNAP 1. NPM can be configured to force visitors to log into Authelia before they are even allowed to see the web app behind it.
#2. Storing DVD Movies (Proceed with Caution)
Yes, you can absolutely use the extra space for non-critical, read-only backups like ripped DVD movies, as long as you follow the "Sacrificial Rule": Never put anything on QNAP 1 that you would be upset to lose, or upset if the public saw it.
If a hacker breaches NPM, they will have access to that 500GB drive. They might delete the movies, encrypt them with ransomware, or use the empty space to host their own malicious files. Since they are just DVDs, losing them is an annoyance, not a disaster.
How to set this up safely with your new Firewall Rules: Because we just locked down the DMZ, your Admin PCs and Primary network can no longer talk to QNAP 1. If you want to copy movies to QNAP 1 or watch them, you need to poke very specific, safe holes in your firewall:
- To copy movies to it: Add a Green rule allowing your Admin PC IP to talk to QNAP 1 only on the SMB port (TCP 445).
- To watch the movies: The safest approach is to run a lightweight media server container (like Jellyfin or Plex) directly on QNAP 1. Then, add a Green rule allowing your Admin VLAN (or specific devices) to access QNAP 1 on the media server's specific port (e.g., TCP 32400 for Plex or 8096 for Jellyfin).
What NOT to do: Do not let a media server on your secure QNAP 2 or Synology reach into QNAP 1 to read the movie files. You want to avoid opening connections from your secure Primary network into your dirty DMZ network whenever possible.
In short: CrowdSec is a fantastic idea for the extra compute power, and Jellyfin + DVD storage is a perfectly safe use of the SSD, provided you treat the files as 100% expendable!
#Q57: This is a screenshot for the updated FW rules. Please check if they are all good! The port-forwarding rules can't be moved so I leave them at the bottom.
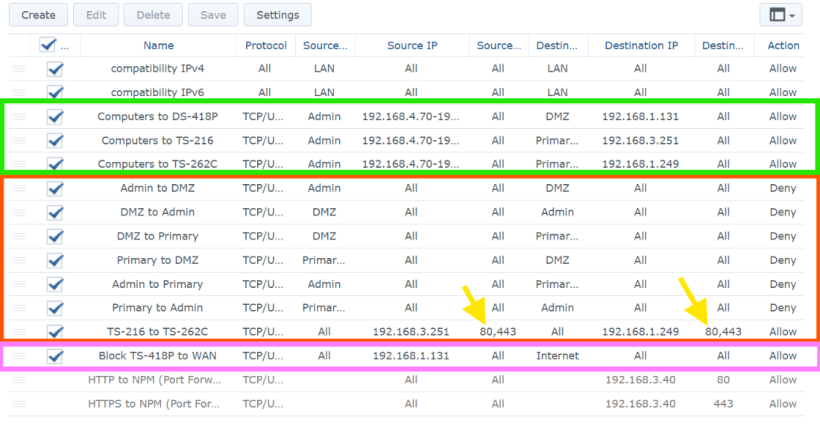
#A: This is a great start, and you have the right idea with the structure! However, I spotted a few critical errors in how the firewall will interpret these rules. Because firewalls read strictly from top to bottom, and because of a few mismatched settings, this current setup will actually break your NPM connection and fail to block what it's supposed to block.
Here are the 5 things you need to fix:
#1. The NPM Allow Rule is trapped below the Deny Rules (Orange Box)
Look at the rule TS-216 to TS-262C (the one with the yellow arrows). You placed it at the bottom of the Orange box.
Because firewalls read top-to-bottom, when QNAP 1 (TS-216) tries to talk to QNAP 2 (TS-262C), it will hit the DMZ to Primary Deny rule first. The firewall will instantly drop the connection and never even read your Allow rule at the bottom.
- The Fix: Move the
TS-216 to TS-262Crule up into the Green box, placing it above all the Deny rules.
#2. The Source Port for NPM is wrong (Yellow Arrows)
In that same TS-216 to TS-262C rule, you set the Source Port to 80, 443. When Nginx Proxy Manager (or any web browser/proxy) sends traffic, it only uses 80/443 for the Destination. For the Source, it generates a random high-numbered port (like 54321). Because you restricted the source port to 80/443, the firewall will block the proxy traffic.
- The Fix: Change the Source Port to
All. Leave the Destination Port as80, 443.
#3. The "Block" rule is actually set to "Allow" (Pink Box)
Look at the far right column for your Block TS-418P to WAN rule. The Action is currently set to Allow. This means your Synology is currently allowed to access the internet!
- The Fix: Change the Action on this rule to Deny.
#4. IP Address Mismatch for NPM (Bottom Rules vs Orange Box)
There is a conflict in your IP addresses.
- In the Orange box, you list TS-216 (QNAP 1 / NPM) as 192.168.3.251.
- In the Port Forwarding rules at the very bottom, you are forwarding HTTP/HTTPS traffic to 192.168.3.40.
- The Fix: Figure out which IP address is actually running NPM. If NPM is on
.251, you must update the port forwarding rules at the bottom to point to.251. If NPM is on.40, you need to update theTS-216 to TS-262Crule to use.40.
#5. Your Zones might be labeled backwards (Green Box)
Take a close look at the "Destination Zone" column in the Green box:
- It lists your Synology (DS-418P, 192.168.1.131) as being in the DMZ.
- It lists your sacrificial QNAP 1 (TS-216, 192.168.3.251) as being in the Primary zone.
- The Fix: This seems backwards based on our previous conversations (TS-216 should be DMZ, the others should be Primary). If your router uses these Zone labels to enforce the Deny rules in the Orange box, your network is going to behave very unpredictably. Double-check your router's interface to ensure the correct IPs are assigned to the correct Zones!
Make these tweaks, and your network will be perfectly locked down! Let me know if you need help adjusting any of these.
#Q58: Thanks for these useful reminder. Please check the updated screenshot. I was assuming that picking the right destination IP will also select the right network. But it seems this is not the case. Can you confirm?
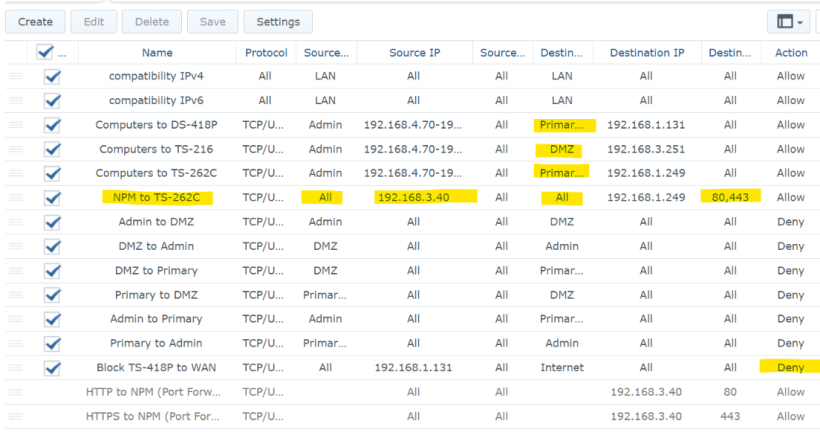
#A: The updated rules look excellent! You have successfully addressed all the critical issues from the previous version. The NPM rule is in the right place, the ports are correct, the block rule is actually blocking, and your zones are now logically assigned.
To answer your question: You are correct to be suspicious. Picking the right IP does not automatically select or override the network zone.
Here is how firewalls process those columns: Firewalls treat the Zone and the IP address as an "AND" condition.
- If a rule says:
Source Zone: DMZANDSource IP: 192.168.1.249, the firewall will look at a packet and ask, "Did this come from the DMZ interface? Yes/No. Is the IP .249? Yes/No." - Because
.249lives on your Primary network, it will never come through the DMZ interface. The firewall would see that mismatch and ignore the rule entirely.
By changing the Source Zone and Destination Zone to "All" for your NPM to TS-262C rule (as you did in this new screenshot), you made a very smart move. You essentially told the firewall: "I don't care which physical port or zone this traffic comes from; if the IP is 192.168.3.40 and it wants to go to 192.168.1.249 on ports 80/443, let it through." This is the safest way to write host-to-host rules without getting tripped up by zone logic.
One final observation that looks good:
I see you used 192.168.3.40 for the NPM rule, but left 192.168.3.251 for the "Computers to TS-216" rule. This makes perfect sense if .251 is the main QNAP 1 management IP, and .40 is a dedicated IP for the Nginx Proxy Manager container (like a macvlan or virtual switch IP).
You are good to go! These rules will securely isolate your sacrificial QNAP 1 while allowing NPM to do its job routing traffic to Chaplaincy Admin on QNAP 2.
Typemill setup.
#Q59: Next, I want to forward various domains to websites on QNAP 2. I've successfully forwarded https://curation.claudioflute.live/ to my Typemill container at 192.168.1.25 but all CSS can't be loaded. The site looks raw and weird.
#A: Congratulations on getting the reverse proxy routing to work! Seeing the raw text means NPM is successfully talking to your Typemill container on QNAP 2.
The "raw and weird" look (where HTML loads but CSS, JavaScript, and images are missing) is a classic reverse proxy hurdle. It is almost identical to the issue we discussed previously with your Chaplaincy Admin config.php file where we had to figure out the correct $host and $appURI.
Right now, Typemill doesn't realize it is being served through a secure external domain. It is likely generating links to its CSS files using either http:// (insecure) or your local IP (192.168.1.25). When your browser loads the secure https://curation... page, it strictly blocks those mismatched or insecure asset requests.
Here is how to fix it, starting with the most likely solution:
#1. Tell NPM to pass the "HTTPS" status to Typemill
Because NPM handles the SSL certificate (HTTPS) and then talks to Typemill over standard HTTP (port 80 usually), Typemill thinks the connection is insecure. We need to pass a header that tells Typemill, "Trust me, the user is using HTTPS."
- Go to your Nginx Proxy Manager admin panel.
- Edit the Proxy Host for
curation.claudioflute.live. - Go to the Advanced tab.
- Paste the following configuration into the Custom Nginx Configuration box:
proxy_set_header Host $host; proxy_set_header X-Real-IP $remote_addr; proxy_set_header X-Forwarded-For $proxy_add_x_forwarded_for; proxy_set_header X-Forwarded-Proto $scheme; - Click Save and hard-refresh your Typemill page (Ctrl+Shift+R).
Note: The X-Forwarded-Proto $scheme; line is the magic bullet here. It tells the app to generate https:// links for its CSS.
#2. Check Typemill's Base URL Settings
If the NPM headers don't fix it immediately, Typemill might have its local IP hardcoded as its base URL.
- Access Typemill locally via your browser (
http://192.168.1.25). - Log in to the author area (
/tm/login). - Go to the Settings -> System (or similar configuration area).
- Look for a field named Url, Base URL, or Domain.
- If it says
http://192.168.1.25, change it tohttps://curation.claudioflute.live.
(Alternatively, if you prefer editing files like we did with Chaplaincy Admin, you can look inside the Typemill container's mapped folders for settings/settings.yaml and check if there is a URL parameter defined there).
#3. How to verify what is failing (The F12 Trick)
If it still looks raw, you can instantly see exactly what URL Typemill is trying (and failing) to load:
- Open
https://curation.claudioflute.live/in Chrome/Edge/Firefox. - Press F12 to open Developer Tools.
- Click on the Console tab.
- You will likely see red error text saying either "Mixed Content" (meaning it tried to load
http://...) or "ERR-CONNECTION_TIMED_OUT" (meaning it tried to load192.168.1.25which your external browser can't reach).
Let me know what the F12 console says if the NPM Advanced tab trick doesn't solve it right away!
#Q60: I found I need to update this proxy IP to that of NPM!
#A: Brilliant find! You hit the nail right on the head.
What you found is a built-in security feature common in modern web applications. By default, many apps will completely ignore X-Forwarded-* headers (like the X-Forwarded-Proto: https we talked about) because malicious users can spoof those headers to fake their IP address or bypass security rules.
The app will only listen to those headers if they come from a Trusted Proxy.
By entering 192.168.3.40 (which we know from your firewall rules is your Nginx Proxy Manager's IP), you explicitly told Typemill: "It is safe to trust the headers coming from this specific IP address."
Now, when NPM tells Typemill, "Hey, the user is connecting via HTTPS," Typemill actually believes it and correctly generates the secure https:// links for all your CSS and image files.
After saving that setting and doing a hard refresh (Ctrl+Shift+R), your Typemill site should be looking perfect with all its styling applied. Is everything loading smoothly now?
Auto Barthender setups.